Showing posts with label floral. Show all posts

Tuesday, March 28, 2017

Easter Egg & Paper Flower Garland

I totally let myself hog this project. I needed some creative space and some mama time so I didn't invite the kids to help on this one. I warded them off by telling them I was making them an Easter surprise - which I kinda was. Kids can definitely help out with this project if you want. Little kids can stuff eggs and cut leaves. Bigger kids can make flowers and tie on the eggs.

This Easter garland boasts beautiful handmade paper flowers and plastic Easter eggs stuffed with treats. The eggs are tied onto the garland with pretty ribbons in coordinating colors.

the finished Easter Egg & Paper Flower Easter Garland with flowers and ribbon tied eggs hanging on a white wall

You can hang it up or use it as a centerpiece along the center of your Easter table.
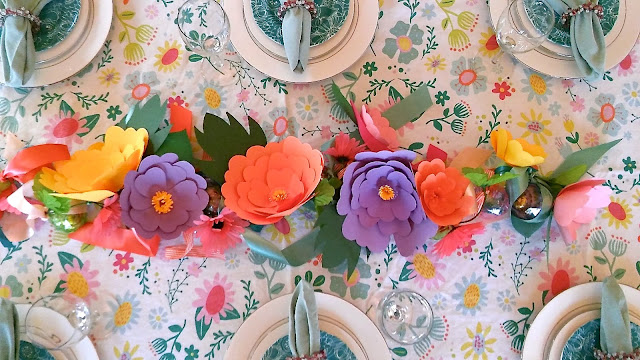
the finished Easter Egg & Paper Flower Easter Garland with flowers and easter eggs tied up with ribbons laying as a centerpiece in the middle of a set Easter table

Kiddos can untie ribbons and open eggs after Easter dinner.

My inspiration for this craft was a gorgeous floral garland from Oh Happy Day. It was wrapped around a giant paper maché egg. How fun is that? I love that site. I've since become obsessed with paper flowers. Stay tuned for a Mother's Day craft that's just as fun and pretty.

A dollar store is a great place to pick up supplies for this craft. Michael's will do too. For this project you'll need:
- construction paper in pastel colors
- a glue stick
- green twist ties (the kind you get at the grocery store produce section)
- large and small pastel plastic Easter eggs
- treats to fill your eggs
- ribbon in multi colors
- a cheap garland
a pic of the paper flowers (pink, purple, orange, and yellow) all finished next to ribbons on a table


I started the project by making paper flowers. They are the most time consuming aspect of this craft. I saw a Martha Stewart flower making kit online and just kind of copied it. I made my own templates and got to work. Go to the bottom of this post for templates.

I made 3 large flowers and about 6 small ones. I used templates P1, P2, P3, B1, and L1 to make big flowers. Templates P3, P4, B2, and L2 make small flowers. Cut out all of your petals and leaves. You'll need 1 leaf, 1 round base, and about 6 of each petal size per flower. You'll also need to cut 1 or 2 half inch strips the length of your construction paper to make the center.
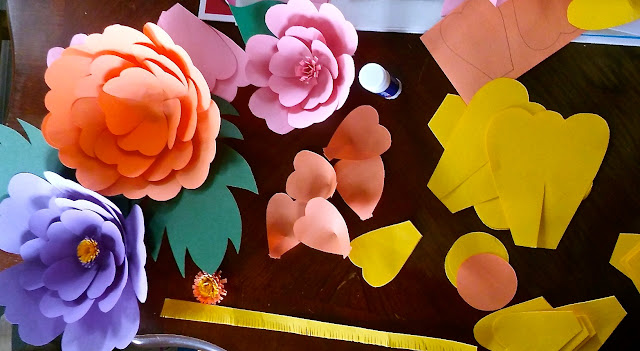
purple, orange, and yellow paper flowers on a table with flower pieces for assembly

You can see one here at the bottom of the picture. Cut little slits along the whole length of your strip(s) to make fringe. Also, prep your petals by cutting a slit in them about 1/3 of the way up from the bottom. Glue one piece over the other causing the petal to pucker as you see above.

paper flower tutorial pic with a finished flower next to a glue stick and a pair of scissors


Cut a small green twist tie in half and glue half of it to the base leaving half of it hanging out. That way you can use it to affix your flower to the garland. Next, glue your leaf down onto the base.

a tutorial pic on how to glue the paper flowers together with petals, leaves, scissors, and glue


Now you can start gluing down your largest petals overlapping them a little as you go. Then glue down the next size. Big flowers have 3 layers, small flowers have 2. Once your petals are all glued fold your leaf up a bit so it isn't so flat looking. I even added a little glue to the big ones to attach them to the side of the big flowers.

Last, roll up your long fringed strip like a fruit roll up and glue it closed. Bend down some of the fringe starting at the outer edge leaving the fringe in the middle standing straight up or bending it in towards the center a little. Glue this to the center of your flower.
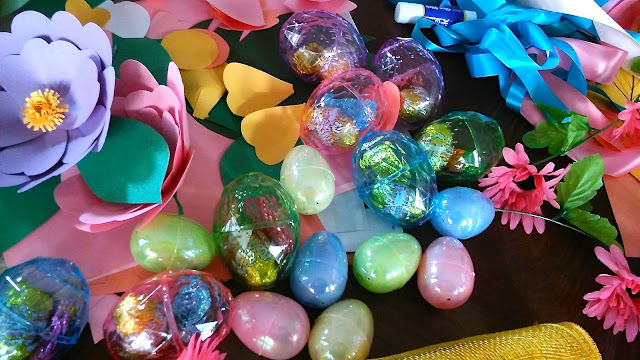
pastel sparkly easter eggs for the Easter Egg & Paper Flower Easter Garland


Once your flowers are ready to go stuff your eggs with treats. I used chocolate peanut butter eggs, chocolate bunnies and carrots, and cute little Easter erasers.

an easter egg tied with a pretty ribbon to go on the Easter Egg & Paper Flower Easter Garland


Cut lengths of ribbon for your eggs. I like the ribbons to dangle festively from the garland. To tie on large plastic eggs you'll need 16 to 18 inch pieces of ribbon. To tie on small or medium eggs cut 10 to 12 inch pieces. Tie an egg on to your garland to make sure you like the length of ribbon hanging.

paper flowers ready to be fastened to a garland


Instead of starting my garland from scratch I used a dollar store garland leftover from Nora's birthday party. This cheap garland was simple and sparse - the perfect base for adding a whole bunch of cuteness. You can also use a long sturdy ribbon.

paper flowers fastened to a garland


First affix your flowers to your garland interspersing them evenly along the length. Then you can start tying on eggs. The stuffed eggs will make your garland a little heavy so take that into account if you hang it.
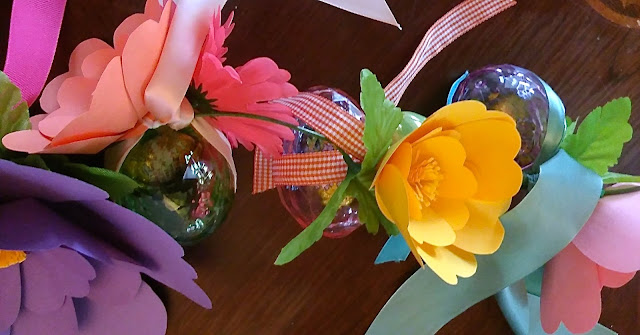
a close up of the Easter Egg & Paper Flower Easter Garland

Happy Easter crafting! Here are my templates.


Easter Egg & Paper Flower Easter Garland template 1
Easter Egg & Paper Flower Easter Garland template 2

Easter Egg & Paper Flower Easter Garland Pin

Sunday, March 19, 2017

Nora's Vintage Floral Birthday Party

I go all out for birthdays. I get kinda crazy with making them super special and something totally tailored to the guest of honor. For Mateo's last birthday I made him an adventure map with flaps to lift up for each portion of his special day - children's museum, spaghetti restaurant, movie theater... . He also spent the day wearing a handmade birthday cake crown and finished out his birthday adventure with a strawberry mochi ice cream cake. Like I said, I go all out.

My baby girl's 1st birthday party was no exception. Before I get into the beautifulness of her special day let me just say that you will not find studio quality photos with perfect lighting, styling, and portraits in this post - I wish. What I do have to offer are real pictures of a real birthday party in real time in a real house with bad lighting. Sorry, not sorry. 😊 I hope the homemade recipes and handmade decorations inspire creativity and adventure in your own real home 😉 (tell me if I'm using too many emojis). So without further ado, here is all about Nora's special day.

For me, the decorations make a party. My eldest son would totally agree with me on that score. Nora's decorations were adorable crafts to make. I started by looking around for invitations I liked on Etsy. I wasn't looking to shop as much as I was looking for inspiration. I settled on a vintage floral theme as I had just finished putting Nora's nursery together and still had vintage on the brain. I used some of the same floral paper I used in her room to cut out hearts for her banners.


I used mini clothespins to pin the hearts between pictures of Nora throughout her first year. A dollar store ribbon served this project perfectly. I finished the banners by tying coordinating ribbons to hang off either end.

Grandma ordered those adorable dress cookies you see peeking out of the basket
I used the same vintage floral paper to make Nora a cake topper. I found a "1" I liked on google images and used it as a template to cut out the number in pretty papers, glued them to a wooden skewer, and added a pink ribbon for extra girlyness.


I printed out pretty little sayings like, "isn't she lovely" and "let her be little," and put them in dollar store frames. I nestled them on tables and counter tops that held food, cake, and drinks.

Pardon my reflection
I made a door hanger in similar fashion by taping a printed sign onto a dollar store mirror and looping a pretty pink ribbon through the back.


Handmade surprise heart packets served as party favors and added to the table decor. I found this idea on Craft with Mom. I cut out paper hearts, put two together only gluing half of the edges closed, stuffed them with treats, and then glued the rest of the edges together - all with a simple glue stick. Dollar store jars, flowers, and floral garlands also decorated the table. Pink paper lanterns, more floral garlands, and pink, peach, and teal ribbons hung simply on our chandelier.


The birthday menu included sausage cheese balls (I use Jimmy Dean's recipe), fresh fruit, mushroom quiches, a big bad cheese platter, sauerkraut & dill tuna salad (recipe follows), balsamic broccoli and bell pepper pasta salad (recipe follows), and a strawberry spinach salad. Nora's cake was a boxed vanilla cake mix doctored with fresh raspberries baked in and frosted with fresh raspberry buttercream (recipe follows). I also served orange-scented iced green tea and raspberry lemonade (recipe follows).


"Happy birthday to me y'all!"

Sauerkraut & Dill
Tuna Salad
(A.K.A. The Best Tuna Salad EVER!!!)

INGREDIENTS
2 cans Chicken of the Sea light tuna packed in water (do not use another brand), drained
4 green onions, chopped
2 stalks celery, chopped thin
¼ tsp dried dill
1 Tbsp whole grain mustard
¼ cup sauerkraut(I use homemade), chopped
¼ cup mayo or to your liking
salt and pepper to taste

DIRECTIONS
1. Combine ingredients in a medium bowl and stir well.
2. Taste and add more salt, pepper, or mayo to get the flavor and consistency you like.
3. Refrigerate in an air-tight container for a few hours for flavors to meld.
* Double this recipe for a party.

Balsamic Broccoli & Bell Pepper Pasta Salad
(This is an adaptation of the recipe found at picsandpastries.com)

INGREDIENTS
7 mini multicolored sweet bell peppers, chopped
1 head broccoli, chopped into bite size pieces
1/3 cup dried cranberries or golden raisins
½ cup diced red onion
12 oz box bow tie/rotini/penne pasta, cooked el dente
½ cup Bolthouse Farms Balsamic Yogurt Dressing (found in the cold case of produce sections)
½ cup mayo
½ cup toasted walnuts
½ cup crumbled Gorgonzola
¼ tsp fresh ground pepper
dash Balsamic vinegar
salt to taste

DIRECTIONS
1. Combine ingredients in a large bowl and stir together.
2. Taste for salt. Add additional balsamic yogurt dressing if it needs more creaminess.
3. Refrigerate in an air-tight container for a few hours for flavors to meld.

Fresh Raspberry Buttercream
(This is an adaptation of the recipe from Sweet Celebrations by the owners of Georgetown Cupcakes)

INGREDIENTS
2 sticks unsalted butter, softened at room temperature for 30 minutes only
4 packed cups powdered sugar
1 tsp vanilla extract
¼ tsp salt
½ cup fresh raspberries, rinsed and allowed to dry

DIRECTIONS
1. Place raspberries in a food processor and process into a puree. You should end up with a little less than 1/3 cup of puree.
2. Cream butter in a stand mixer for 30 seconds with your paddle attachment.
3. Add 2 cups powdered sugar and beat with butter until creamy.
4. Beat in salt, raspberry puree, and vanilla extract.
5. Beat in last 2 cups of powdered sugar.
6. Scrape down bowl and beat for 3 minutes until light and fluffy.
* Make two batches to frost a four layer cake.

Raspberry Lemonade

INGREDIENTS
2 cups granulated sugar
2 cups water
1 ½ to 2 cups fresh squeezed lemon juice
4 cups raspberries
2 to 4 cups water

DIRECTIONS
1. Make a simple syrup by heating 2 cups sugar with 2 cups water on medium low heat in a medium saucepan. Stir gently until sugar is completely dissolved and you can feel no more granules at the bottom of the pan as you stir. Cool to room temperature.
2. Place raspberries in a high speed blender with 1 cup water. Blend on low until raspberries are broken down, then slowly increase speed to high and blend on high a couple of minutes.
3. In a large pitcher add 1 ½ cups lemon juice, 2 cups simple syrup, all of the raspberry mixture, and another cup or two of water. Taste for sweetness and tartness according to your liking adding in more simple syrup, lemon juice, or water as you see fit.
4. Strain lemonade through a fine mesh strainer for a smooth drink.
5. Refrigerate until cold.
6. Garnish with fresh raspberries and lemon slices.

Sunday, March 12, 2017

Project Pretty Nursery

We recently moved our baby girl out of our room and into the small room the boys were sharing. The boys moved into our school/guest room which suits them better with a bigger space. I dearly miss our school room set up, but this arrangement is best for everyone right now.

That little room needed a total overhaul, let me tell you. Those boys were rough on it. We had to scrub the walls, paint, replace the blinds, and replace the curtain rod. We still have to replace the window screen. Our little labors of love.


I was so excited to put this nursery together never having decorated for a little girl before. My inspiration for the room were some adorable fabric banners a friend sent me for Nora. They're made with vintage fabric squares sewn onto a vintage blue ribbon.


Here is one of the banners draped on the curtains. I hung the other on Nora's changing table. 

I chose a vintage light blue color for the walls - Sherwin Williams' Watery. I used vintage fabrics, vintage paper, and floral accents throughout the room. It was so much fun to work on this project. I love girly things. Here are some of the floral details I incorporated into the room.


I used a lot of items I already had on hand - baskets, tea tins, throw pillows, an old mirror, and some cute cottage style chairs a neighbor had given me a few years back. I love thinking about how to use what I already have on hand. The room boasts a couple of handmade projects too.


I put together a banner with ribbon, mini clothespins, and handmade paper dolls that I made last year.


I also hung up a large decorative frame made out of toilet paper roll flowers that I put together for Nora before she was born. I found this idea on Pinterest.

Nora's rocking chair corner is quite cozy with a lamp, baby books, and extra pillows within arm's length. Oh, and Nora's handmade quilt made by Grandma.

The changing table has everything I need in the easy to reach fabric drawers and hamper underneath. The vintage style chairs on either side provide extra surfaces whenever I need to put something down without having to leave my pretty girl on the table unattended.

I put up a gallery wall with hand-painted letters hanging on ribbons, frames filled with vintage paper, my toilet paper roll flower frame, an old mirror that used to be in our living room, and a dollar store metallic flower. 


These hooks are left over from the boys' old room. We just re-secured them to the wall as they were a little worse for the wear. I added a cute floral wreath above that I usually put on our front door in the summer months and hung some princess dresses below.


Such a sweet project. Having a little girl is super fun!