Thursday, March 30, 2017

April Fool's Day Cupcakes

Eggs anyone?


I loved April Fool's Day growing up. Every year I would call both of my grandmothers claiming there was a terrible emergency and they needed to come over right away (I know, so mean, right?), and every year I would fool them. Like a grandmother should, they took that kind of call very seriously. That's probably why I got them each time. 

I haven't played an April Fool's prank in many a year. They stopped working for me after I grew up. Some people just don't have the knack I guess. This year while explaining April Fool's Day to my boys (no, I didn't tell them what I used to do) we decided a fun prank would be in order. So we're playing one on ourselves (giggle, giggle). I saw some "Sunny Side Up Cupcakes" on Fork and Beans last year that I thought would be perfect for us to try.


I doctored a gluten free cake mix to make lemon poppy seed cupcakes and whipped up my favorite almond frosting.


They baked up pretty.


Prepped and ready for the boys to decorate.
I drained the apricot halves on a paper towel and put out a small dish of poppy seeds I called "sprinkles". Ezra doesn't like nuts or seeds, so I have to fool him. April fool him, that is. Hee, hee. I piped the frosting and the boys got to work decorating the cupcakes to look like eggs.


Don't put all your eggs in one basket. Ha!

We didn't really fool anyone - except maybe my low carb diet. Just a bunch of good, clean, silly, Loverbee cupcake fun.


April Fool's Cupcakes

GLUTEN FREE LEMON POPPY SEED CUPCAKES:
INGREDIENTS
1 gluten free Betty Crocker yellow cake mix
½ cup unsalted butter, softened
3 large eggs
2 tsp vanilla
1 Tbsp lemon zest
1 Tbsp poppy seeds
1/3 cup fresh lemon juice
1/3 cup water

DIRECTIONS
1. Preheat oven to 350 degrees.
2. Line a cupcake pan with 12 cupcake liners.
3. Prepare cake mix according to package directions adding in the lemon zest and poppy seeds and subbing 1/3 cup lemon juice for 1/3 cup of the water.
4. Scoop evenly among your 12 cupcake liners and bake about 18 minutes or until a toothpick comes out clean.
5. Cool completely.

ALMOND FROSTING:
INGREDIENTS
½ cup unsalted butter, softened
½ cup shortening
4 cups powdered sugar
1 ½ tsp vanilla extact
½ tsp almond extract
1 to 4 Tbsp milk

DIRECTIONS
1. Beat butter and shortening with a mixer for 30 seconds.
2. Beat in 2 cups powdered sugar until creamy.
3. Beat in vanilla and almond extracts.
4. Beat in 2 more cups powdered sugar.
5. Add milk a tablespoon at a time until frosting is piping consistency.
6. Beat for 3 minutes until light and fluffy.

PUT THE CUPCAKES TOGETHER:
You'll need 12 drained apricot halves and a teaspoon or so of poppy seeds for decorating. Use a large round tip to pipe frosting onto your cupcakes. Settle an apricot in the center of each cupcake and top with a sprinkling of poppy seeds.


Tuesday, March 28, 2017

Easter Egg & Paper Flower Garland

I totally let myself hog this project. I needed some creative space and some mama time so I didn't invite the kids to help on this one. I warded them off by telling them I was making them an Easter surprise - which I kinda was. Kids can definitely help out with this project if you want. Little kids can stuff eggs and cut leaves. Bigger kids can make flowers and tie on the eggs.

This Easter garland boasts beautiful handmade paper flowers and plastic Easter eggs stuffed with treats. The eggs are tied onto the garland with pretty ribbons in coordinating colors.

the finished Easter Egg & Paper Flower Easter Garland with flowers and ribbon tied eggs hanging on a white wall

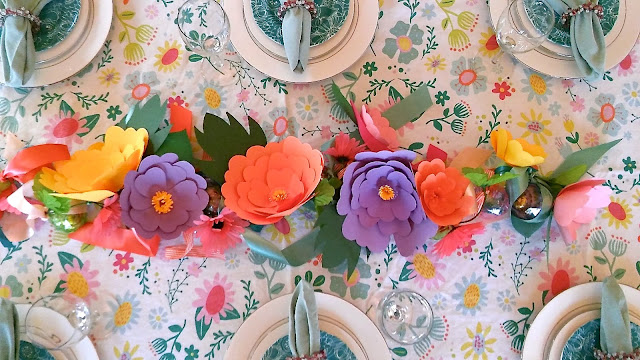
You can hang it up or use it as a centerpiece along the center of your Easter table.

the finished Easter Egg & Paper Flower Easter Garland with flowers and easter eggs tied up with ribbons laying as a centerpiece in the middle of a set Easter table

Kiddos can untie ribbons and open eggs after Easter dinner.

My inspiration for this craft was a gorgeous floral garland from Oh Happy Day. It was wrapped around a giant paper maché egg. How fun is that? I love that site. I've since become obsessed with paper flowers. Stay tuned for a Mother's Day craft that's just as fun and pretty.

A dollar store is a great place to pick up supplies for this craft. Michael's will do too. For this project you'll need:
- construction paper in pastel colors
- a glue stick
- green twist ties (the kind you get at the grocery store produce section)
- large and small pastel plastic Easter eggs
- treats to fill your eggs
- ribbon in multi colors
- a cheap garland
a pic of the paper flowers (pink, purple, orange, and yellow) all finished next to ribbons on a table


I started the project by making paper flowers. They are the most time consuming aspect of this craft. I saw a Martha Stewart flower making kit online and just kind of copied it. I made my own templates and got to work. Go to the bottom of this post for templates.

I made 3 large flowers and about 6 small ones. I used templates P1, P2, P3, B1, and L1 to make big flowers. Templates P3, P4, B2, and L2 make small flowers. Cut out all of your petals and leaves. You'll need 1 leaf, 1 round base, and about 6 of each petal size per flower. You'll also need to cut 1 or 2 half inch strips the length of your construction paper to make the center.

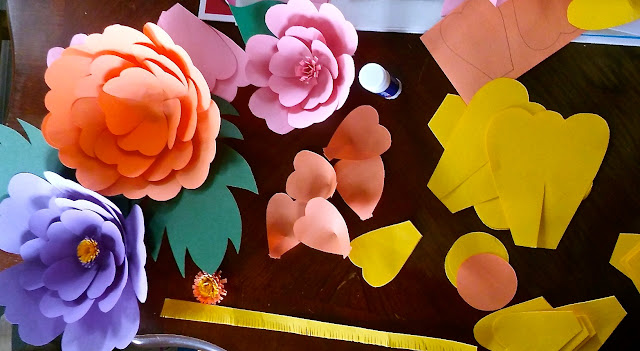
purple, orange, and yellow paper flowers on a table with flower pieces for assembly

You can see one here at the bottom of the picture. Cut little slits along the whole length of your strip(s) to make fringe. Also, prep your petals by cutting a slit in them about 1/3 of the way up from the bottom. Glue one piece over the other causing the petal to pucker as you see above.

paper flower tutorial pic with a finished flower next to a glue stick and a pair of scissors


Cut a small green twist tie in half and glue half of it to the base leaving half of it hanging out. That way you can use it to affix your flower to the garland. Next, glue your leaf down onto the base.

a tutorial pic on how to glue the paper flowers together with petals, leaves, scissors, and glue


Now you can start gluing down your largest petals overlapping them a little as you go. Then glue down the next size. Big flowers have 3 layers, small flowers have 2. Once your petals are all glued fold your leaf up a bit so it isn't so flat looking. I even added a little glue to the big ones to attach them to the side of the big flowers.

Last, roll up your long fringed strip like a fruit roll up and glue it closed. Bend down some of the fringe starting at the outer edge leaving the fringe in the middle standing straight up or bending it in towards the center a little. Glue this to the center of your flower.

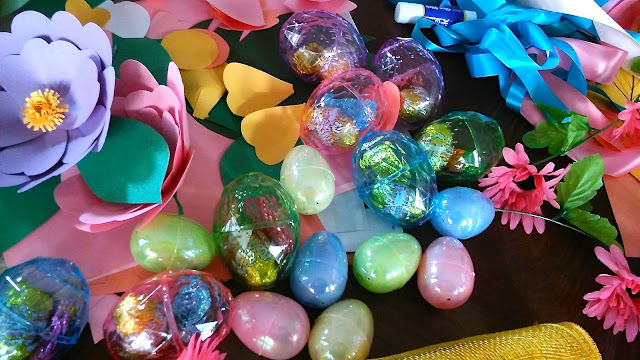
pastel sparkly easter eggs for the Easter Egg & Paper Flower Easter Garland


Once your flowers are ready to go stuff your eggs with treats. I used chocolate peanut butter eggs, chocolate bunnies and carrots, and cute little Easter erasers.

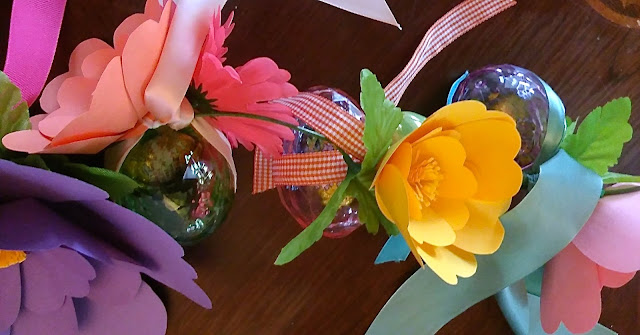
an easter egg tied with a pretty ribbon to go on the Easter Egg & Paper Flower Easter Garland


Cut lengths of ribbon for your eggs. I like the ribbons to dangle festively from the garland. To tie on large plastic eggs you'll need 16 to 18 inch pieces of ribbon. To tie on small or medium eggs cut 10 to 12 inch pieces. Tie an egg on to your garland to make sure you like the length of ribbon hanging.

paper flowers ready to be fastened to a garland


Instead of starting my garland from scratch I used a dollar store garland leftover from Nora's birthday party. This cheap garland was simple and sparse - the perfect base for adding a whole bunch of cuteness. You can also use a long sturdy ribbon.

paper flowers fastened to a garland


First affix your flowers to your garland interspersing them evenly along the length. Then you can start tying on eggs. The stuffed eggs will make your garland a little heavy so take that into account if you hang it.

a close up of the Easter Egg & Paper Flower Easter Garland

Happy Easter crafting! Here are my templates.


Easter Egg & Paper Flower Easter Garland template 1
Easter Egg & Paper Flower Easter Garland template 2

Easter Egg & Paper Flower Easter Garland Pin

Monday, March 27, 2017

CUPCAKES!!!

It's been so long since I've baked a batch of cupcakes. I know, me? How could this be? Total twilight zone over here. Matthew and I have been trying to lower our carb intake. We're staying away from breads and sweets mostly. I rarely make desserts at all, except for birthdays. The closest we get to dessert these days are homemade protein bars.

This week I broke down. I miss cupcakes so much.


"I'm so sorry for desserting you cupcakes. Don't be mad. Let's be friends again." Get it? "Desserting" you? Ha!

Giving way to craving I chose to make a gluten free black bean brownie cupcake. Whew! That's a mouthful. My husband questioned my choice. He knew I had been craving cake and wondered why I chose such a healthy option. Well I can't give up entirely after all. 

I used a recipe I modified a while back that I always pull out when I'm trying to eat healthy.


This brownie batter comes together in the food processor. It's not quite as good as a regular brownie or chocolate cake, but it scratches the itch without annihilating my diet - although the frosting might just do me in.


It also bakes up a little strange. Maybe strange is the wrong word to use. The tops look and feel a little hard and shiny. Just use the toothpick test to tell when your brownies are done. It should come out almost clean with a little brownie stuck to it, but not liquidy looking.


This cupcake is a mini spumoni brownie cupcake. I tossed some chopped pistachios in the brownie batter, made a sweet cherry frosting, used up some leftover chocolate ganache drizzled on top, sprinkled pistachio dust on top of that, and topped it with half a maraschino cherry. A lot going on here, I know.


It's hard for me to make plain cupcakes. I do enjoy them, I just have a hard time making them. You could say I have a problem.


This was my little "helper" in the kitchen while I baked. I had to strap her into her stroller while I used the oven. She is always right behind me. Love her!!! She even matches the cupcakes.


Spumoni Brownie Cupcakes

GLUTEN FREE BLACK BEAN BROWNIE CUPCAKES:
INGREDIENTS
2 large eggs
1 can black beans, rinsed and drained well
¾ cup cocoa powder
½ cup sugar
3 Tbsp vegetable oil
¼ tsp salt
2 tsp baking powder
1 tsp vanilla extract
½ tsp xanthan gum
¼ cup chopped pistachios

DIRECTIONS
1. Preheat oven to 350 degrees and line a mini cupcake pan with mini cupcake liners (makes about 24).
2. Dump eggs in the food processor and scramble.
3. Add all other ingredients (minus pistachios) and process until batter is smooth.
4. Stir in pistachios.
5. Fill each liner with a small cookie scoop or about 2 Tbsp worth of batter.
6. Bake about 12 to 18 minutes until a toothpick comes out mostly clean. You want to see a little brownie stuck to it, but not liquidy batter. Check after 12 minutes.
7. Cool completely.

SWEET CHERRY FROSTING:
INGREDIENTS
½ cup unsalted butter, softened
4 cups powdered sugar
3 Tbsp maraschino cherry juice
½ tsp almond extract
1 to 3 Tbsp additional maraschino juice for consistency

DIRECTIONS
1. Beat butter for 30 seconds.
2. Beat in 2 cups powdered sugar until creamy.
3. Beat in 3 Tbsp maraschino juice and almond extract.
4. Beat in 2 more cups powdered sugar.
5. Scrape down bowl and check consistency of frosting. If it's too firm add another ½ Tbsp maraschino juice, beat, and check again. Repeat if necessary.
6. Beat 3 minutes until light and fluffy.

CHOCOLATE GANACHE:
INGREDIENTS
½ cup semi-sweet chocolate chips or chopped chocolate
¼ cup cream

DIRECTIONS
1. Place chocolate in a heat proof bowl.
2. Heat cream in a clear microwave safe cup or bowl in the microwave for 1 minute or less watching it carefully until it just starts to bubble.
3. Immediately pour the hot cream over the chocolate and let it sit for 5 minutes.
4. Stir until all chocolate is melted and ganache is smooth. Let sit 15 minutes before using.

PUTTING THE CUPCAKES TOGETHER:
To put the cupcakes together you'll need about 12 maraschino cherries cut in half and about a tablespoon of pistachio dust from when you chopped your pistachios for the brownie. Just use the tiny pieces/particles that are left over.

I used a large round tip in a snipped ziplock bag to pipe puffs of frosting on top of the mini cakes. Then I used a tiny round tip in a snipped ziplock bag to pipe ganache on top of the frosting. You can also drizzle the ganache with a spoon. Sprinkle with pistachio dust and top each with half a cherry cut side down.

I ended up taking these cuties to our church potluck so I wouldn't eat them all. When they were all gone the boys asked if I could make some more. I guess they miss cupcakes too.


Saturday, March 25, 2017

What's for Dinner? Soyrizo Hash & Baked Egg Skillet

Quick Dinner Queen here. I wouldn't say I'm the ultimate master of quick dinners so much as I'm the ultimate lover of quick dinners. They mean so much to me these days. I love good home cooked food, so when I can produce something fast and easy and delicious, I am just giddy. Don't underestimate the power of good 'ol fashioned Hamburger Helper though. Am I grossing some of you out with that one? I apologize - sort of.


This skillet dinner can be done all in one skillet starting at the stove and finishing off in the oven. I, however, despise frying potatoes in a pan. I have never conquered that task. They always burn on me or take F-O-R-E-V-E-R to cook. I can't waste my life that way so I add in an extra step and roast them before I toss them in with the soyrizo.


Just make sure you chop them small. You want them the right size for hash. Also, they only take about 20 minutes to roast that way.


By the way, pork or beef chorizo is totally great in this dish as well. I prefer soy because it doesn't have those little bits of hard to chew somethings that I don't want to think about. The flavor of real meat chorizo is totally superior though, so pick your poison.


Also, if you have Cotija cheese, add a tablespoon or two with your cheddar. Trust me.


Soyrizo Hash & Baked Egg Skillet

INGREDIENTS
About 2 lbs red potatoes, chopped small and patted dry
olive oil to coat
8 oz soyrizo
6 eggs
salt & pepper to taste
1 cup shredded sharp cheddar
2 Tbsp grated Cotija (optional, but preferable)
¼ cup chopped green onions
¼ cup chopped cilantro
olive oil spray
sour cream and Tapatio hot sauce for serving

DIRECTIONS
1. Preheat oven to 450 degrees.
2. Line a baking sheet with foil and spray with oil spray.
3. Toss dry chopped potatoes with salt & pepper and a drizzle of olive oil in a medium bowl. Dump out onto baking sheet and roast about 20 to 23 minutes until golden brown and cooked through. Remove potatoes and reduce oven temp to 425 degrees.
4. Heat a large skillet generously sprayed with oil spray over medium-high heat until hot. “Brown” chorizo about 3 minutes. Toss in cooked potatoes and coat. Turn off heat.
5. Make six little wells for the eggs. Spray each well with cooking spray and break an egg into each. Work quickly.
6. Sprinkle skillet with cheddar and bake about 10 minutes or until eggs are done to your liking.
7. Sprinkle with green onions and cilantro.
8. Serve with sour cream and Tapatio hot sauce.


Friday, March 24, 2017

The Dreaded School Prep

Sometimes I dread prepping school as much as my kids dread doing school. On those days, when I am totally unmotivated, this is what helps me - watching The Pioneer Woman as I work. I also love watching Farmhouse Rules, Southern at Heart, and Heartland Table. Pretty much any country cook get'n down in the kitchen will do the trick. I get to enjoy something I really like while doing something I don't always want to do. It's the little things, right?

You can see The Pioneer Woman on amidst my mess.

I used to try to squeeze in prep on Sunday nights. Those were not happy times. A few months ago I decided to prep on Mondays. We don't do any school on Mondays now. I take the whole day to leisurely prep and get myself together. We have to double up a few things during the rest of our school week, but it is so worth it. A sane mama is good for all involved.

These days I have more than a few things to prep. The boys do Science, Bible, and Art classes together. Science and Bible are daily subjects and the easiest to prep. For Bible class we are going through a devotional book for kids that my neighbor gave me. We have a Bible theme and verse that we go over each day along with stories and discussion topics that match the theme. We're working on intentional character development these days.

Science prep is also easy. Our homeschool program provides us with a science workbook and we work through a couple of lessons each week. I use one of those days for science journaling and we sometimes do a science experiment or project to supplement our work. I also look for science videos online that compliment our lessons for the week.

Art is never a drag to prep. Now you know where my heart is. We do art class once a week. During busy times we have to push it to every other week. None of us like that.

Ezra does a letter of the week curriculum and just started kinder math. Mateo does first grade math and language arts. Teo's language arts work takes the longest to prep. There is a lot of information and options to sift through. I read through a hefty teacher's manual, 3 books, and 2 workbooks, plus a stack of extra spelling worksheets.

Mateo practicing his spelling words.

Mateo's favorite part of his language arts work is reading the stories. He is becoming quite the little reader. It is so encouraging to see the fruit of your teaching labors come to fruition.

Ezra journaling on the ground where he can really spread out. Yes, I have two lefties.

It's a lot of work, this prep stuff. It's a labor of love. Is it worth it? Totally. Is it always fun? Heck no. But I have some country ladies sharing love and fun in the kitchen to keep me company.

Thursday, March 23, 2017

What's for Dinner? One Skillet Turkey Pot Pie

Easy dinners on the brain over here. We've had a lot of events and appointments, on top of our already busy schedule, to keep us extra busy lately. That means Mama's been making a lot of one pan meals and easy casseroles. Not to mention frozen pizza and Taco Bell 12 pack taco box dinners.


This one-skillet dinner starts off on the stovetop and finishes off in the oven with a tater tot topping. The ingredients are short cuts too. I use turkey gravy from the jar, frozen mixed veggies in one of those bags you steam in the microwave, and a topping of tater tots.


Not all jars of gravy are created equally, so make sure to taste your pot pie mixture and add salt and pepper to taste.


If you want a more traditional pot pie you could always use a store bought roll-out pie crust. In that case adjust your oven temp to 375.


Skillet Turkey Pot Pie

INGREDIENTS
1 Tbsp butter
1 lb ground turkey
1 12 oz bag Steam Fresh frozen mixed veggies
1 small onion, diced
2 stalks celery, chopped
1 clove garlic, minced
2 12 oz jars, or cans, turkey gravy
¼ tsp salt or to taste
fresh cracked pepper
1 32 oz package frozen tater tots

DIRECTIONS
1. Preheat oven to 425 degrees.
2. Cook frozen veggies in microwave according to package directions.
3. Heat butter in a large skillet over medium high heat. Add celery and onion and saute until translucent.
4. Add turkey and sprinkle with salt and pepper. Brown meat and cook through.
5. Add garlic and cook for 1 minute.
6. Dump in mixed veggies and gravy. Cook a few minutes. Taste for salt and pepper. I added about ¼ tsp more salt.
7. Turn off heat and top with tater tots.
8. Place in oven and bake 30 to 40 minutes until tater tots are crisp and golden brown and casserole is bubbling.

Wednesday, March 22, 2017

Independent Creativity: An Impromptu Building Project

Boxes, boxes, boxes - little boys and boxes. Mateo found a box out by our garbage cans that Matthew intended on taking to the dump. Mateo to the rescue (cue Superman themed music)! There was no way he was gonna let that box meet an untimely end.

The boys dragged it into the house (it had yet to get soiled) and commenced fighting over what to do with it. Mateo wanted to make it into a toy box. Ezra wanted to turn it into a car. The tall skinny box was at their mercy. To stop the bickering (no one was backing down) I suggested they think about a project that would better suit a tall skinny box like that. Someone suggested a building and the other emphatically agreed. I don't always get involved in squabbles, but when I can tell it will end in tears I try to steer things in a different direction to spare us all the drama. It doesn't always work, by the way.

We worked together to tape paper to both sides. One boy drew one side of the building while the other boy drew the other side.


I like these kinds of projects because they are all kid - inspired by them, initiated by them, completed by them. I help by finding tape when asked. Otherwise, I stay out of it. That means a few mama moments alone while the kiddos are busy doing their thing. I can always use some of that.


Tuesday, March 21, 2017

What's for Dinner? Sheet Pan Kielbasa and Potatoes

I'm always on the look out for quick dinners - especially one pot or one pan recipes. I love cooking, but it can add a lot of stress to my daily life while homeschooling two rambunctious boys and caring for a little miss lovely who doesn't like to stay asleep. 


Sometimes I just make up recipes. Here's one I made up when I had kielbasa and golden potatoes on hand. I served this one pan dish with one of those store-bought salad bags where everything is included in the bag. I love those things!


The trick to one pan dishes is to make sure everything cooks at the same time. I cut my potatoes into quarters and leave the onion in big chunks that won't burn during the 30 minutes or so it takes my potatoes to cook through. The kielbasa is forgiving, but if I was using something like chicken, I would need to take that into consideration too.


You wanna see browned meat and potatoes with onions that aren't little black shards. You also want your fork to slide easily into both the potatoes and the onions.

Sheet Pan Kielbasa & Potatoes

INGREDIENTS
1 13 oz package Kielbasa, cut into big chunks (use 2 packs for a big family)
1 1/2 lbs golden potatoes, quartered
1 onion, quartered or cut into really big chunks
Olive oil to coat
Olive oil spray
Salt and pepper to taste

DIRECTIONS
1. Preheat oven to 450 degrees.
2. Spray a large foil-lined baking tray with oil spray. (foil makes for easy clean up)
3. Place potatoes in a large bowl. Sprinkle generously with salt and pepper. Drizzle in a little olive oil and toss to coat.
4. Add the kielbasa in with the potatoes and toss together. Pour out onto your prepared sheet pan.
5. Spray your onion pieces with oil spray on both sides and sprinkle with salt and pepper. Nestle them gently onto your pan among the sausage and potatoes.
6. Roast about 30 minutes until meat and potatoes are browned and potatoes and onions are tender.