Monday, May 29, 2017

In Search of the Perfect Picnic: Anniversary

Matthew and I just celebrated 11 years of sweet marriage - usually sweet, sometimes hard, always worth it kinda marriage. Historically (10 years of history, that is), we've gone out to dinner at a fancy shmancy restaurant to celebrate - usually of the French variety. French is my favorite type of food, followed closely by Indian.

This year we did something a little different. Our baby girl is super clingy and at that toddling stage where being buckled down is not always an option, so I knew a fancy restaurant wouldn't work out so great. As you may already know, we are big fans of picnic-ing, so I put together an anniversary picnic for us to enjoy after the kids went down for the night. We put them down early to enjoy some of the daylight and cool weather out on our deck.


Matthew provided the blooms. ๐Ÿ˜Š

The only thing I really made for this picnic were some lovely chocolate covered blackberries. I adore these sweet and fresh little treats. I make them for special occasions or to decorate cakes sometimes. They are quite romantic, wouldn't you say? And a nice change from chocolate dipped strawberries.


These pretty morsels are very easy to make. The blackberries get dipped in dark chocolate and then drizzled with white chocolate. I melt my chocolate in the microwave. Ina Garten has a great trick to temper chocolate without a double boiler and thermometer. She melts a portion of her chocolate in the microwave, then stirs in the rest to melt it in. Very easy.


I had leftover melted chocolate, so I decided to make a few freehand decorations on a sheet of wax paper. They added a cute touch to our dessert plate.


A bottle of our favorite champagne and a cheese tray with our favorite noshing items are all we really needed to make this a splendid anniversary. Also, candles are a must at this type of picnic.


Here's my sweetheart putting up with more picture taking.

Blue cheese, Irish Cheddar, toasted nuts, marinated olives, and sweet baby gerkins are some of our favs.


Putting together a cheese board is easy peasy and a lot fun - if you like cheese, that is. Pick a few of your favorite cheeses, crackers or bread or crostinis, something pickled or briny or both, fruit spread/preserves or dried fruit for a little sweetness, fancy mustard or pesto or tapanade, cured meat is good, and nuts are a nice touch too. I always toast my nuts for added depth of flavor. You can also add fresh fruit or roasted vegetables. Grapes, berries, cherries, sliced apple or pear, cherry tomatoes, roasted red peppers and roasted beets are real winners. It's really all about what you like. There is no wrong way to do this thing. Beer drinkers can add pretzels, mustards, black pepper encrusted salami or beef jerky even, a variety of cheddars, maybe some horseradish, pickles, or even fried pickles. Just go crazy with it.

I, personally, like to slice my cheese. A wedge of cheese and a pretty cheese knife is nice to look at on your board, but I don't like slicing over and over as I nosh - especially if your tray is for a cocktail party type of affair where guests will be standing around with drinks in their hands. I also usually opt for a smaller tray and pile things high, close to each other, and even on top of each other for a bountiful look.

Check out my Pinterest board on food trays, boards, and platters for more inspiration.

What would you put on your dream cheese board?


Chocolate Dipped Blackberries

INGREDIENTS
1 pint blackberries, rinsed and dried
1 cup chopped dark or semisweet chocolate or chocolate chips
1/2 cup chopped white chocolate or white chocolate chips

DIRECTIONS
1. Line a sheet pan with wax paper.
2. Place about 3/4 of the dark chocolate in a small microwave safe bowl and melt in 15 second increments, stirring each time, until melted.
3. Add the rest of the dark chocolate and stir until all melted.
4. Using a fork, dip each berry into the chocolate and lift out with fork letting any excess chocolate drip off. Place on wax paper.
5. When all berries are dipped, place sheet pan in the fridge to set - about 20 minutes or so.
6. Place about 3/4 of the white chocolate in another small microwave safe bowl and melt in 15 second increments, stirring each time, until melted.
7. Add in the rest of the white chocolate and stir until melted. (White chocolate is a little more difficult to work with. If it doesn't fully melt, put the bowl back in the microwave for 15 seconds at a time, stirring each time, to completely melt the chocolate.)
8. Pour white chocolate into a Ziplock freezer bag. Snip off a very small piece of the corner so you can pipe the chocolate onto your berries in a drizzle type of pattern.
9. Place berries back in the fridge to set again.
10. I keep mine in the fridge until I'm ready to use them.

* This recipe works best with large firm blackberries.
* Chopped baking chocolate works best as chips tend to have added ingredients that affect melting, but I've happily used both.

Saturday, May 27, 2017

Cherry Pie with Sourdough Crust

I made my first pie in ages because cherries are in season. Well, actually, I made it because I wanted to try this pie crust recipe using my sourdough starter - and because I wanted pie. I don't really need a reason though, do I?


My neighbor and I are sourdough sistas. We heart sourdough. ๐Ÿ˜ She's been making pies using her sourdough starter for the past year or two. I finally gave it a try this week and have fallen head over heels for this pastry.


The recipe I used from Cultures for Health requires a good amount of fat. I used mostly butter with a little shortening.


The result is a super flaky, almost puff pastry like, texture. It doesn't taste like sourdough, but it does still give you all the benefits of those healthy little microbes. They break down the structure of the wheat flour so that it's easier to digest. Good for the gut. ๐Ÿ‘


The dough ferments in a warm place for seven hours. Then it gets refrigerated for at least 4 hours until cold. That's how it turns out so flaky. All those fabulous chunks of cold fat melt and create the layers of pastry that give you that delicate, buttery, lightly crunchy mouth feel.


I have to say, it isn't a very pretty dough. The baked pie isn't very pretty either. I tried a batch of pastry where I tried to break down the fat a bit more, but there's just such a high fat to flour ratio that it really didn't make much difference.


Yay cherries! We love cherries up in here. I had to swat hands away as I prepped cherries for pie and jam. I got this cherry filling recipe from Sally's Baking AddictionThe little bit of almond extract she calls for is just wonderful.


Dotting the pie filling with a little bit of butter is a technique I've never understood but always followed. Just do it.


The pie bakes up a little monstrous. What it lacks in beauty it makes up for in deliciousness.

You'll need a sourdough starter for this recipe. If you don't already have one, you can start your own using instructions from King Arthur Flour. The process takes several days. You can also purchase one online or ask a friend who already has one. People with cultures love to share. Then you can chat about sourdough recipes and become sourdough sistas - or brothas - or whatevas.


Cherry Pie with Sourdough Crust
(See Cultures for Health and Sally's Baking Addiction for original recipes)

INGREDIENTS
2 cups flour
1 tsp salt
1 Tbsp sugar
1 cup unsalted butter, cold and cubed
1/2 cup shortening, cold and cubed
1 cup sourdough starter
4 1/2 to 5 cups pitted cherries
1/2 cup sugar
1/4 cup cornstarch
1 Tbsp lemon juice
1 tsp vanilla extract
1/4 tsp almond extract
1 Tbsp unsalted butter, cold and cubed small
1 large egg
1 Tbsp milk

DIRECTIONS
1. Prepare your sourdough pastry by combining 2 cups flour, 1 tsp salt, and 1 Tbsp sugar.
2. Cut in 1 cup butter and 1/2 cup shortening using a pastry cutter until you have big chunky crumbs.
3. Add sourdough starter a little at a time, stirring with a fork, just until dough starts to come together. This may take a cup, or less, or a little more. I know, vague, right? I ended up using about 3/4 of my cup. As soon as your dough starts clinging together, stop adding starter. (Quick note: Not adding enough starter will result in a dough that is hard to roll out and difficult to work with. In that case, use a generous amount of flour when rolling out. It won't fix the problem, but it will help.)
4. Once dough comes together, cover with plastic wrap and place a clean kitchen towel on top of that. Place in a warm place to ferment for 7 hours. I use my microwave with the oven light on low.
5. Then, refrigerate the dough for 4 hours or until cold.
6. Preheat oven to 400 degrees.
7. Prepare your filling by combining the cherries, 1/2 cup of sugar, cornstarch, lemon juice, vanilla, and almond extract in a medium bowl. Toss to combine and let sit to marinate while you roll out your dough.
8. Divide your cold dough in half and roll one half out on a floured surface. Line a standard pie plate with the dough and trim the edges.
9. Scoop your cherries with a slotted spoon into the crust leaving most of the liquid behind in the bowl. Dot filling with 1 Tbsp cold cubed butter.
10. Roll out second half of your dough and place on top of your filling. Trim the edges and tuck them in under the bottom crust all the way around. Crimp your edges with your fingers or a fork or whatever technique you like to use.
11. Place pie in freezer for 5 minutes.
12. Meanwhile, whisk together the egg and 1 Tbsp of milk to make an egg wash.
13. Brush pie with egg wash, cut slits on top to vent, and bake on a baking sheet to catch any drips for 20 minutes.
14. Reduce oven temperature to 375 degrees and bake another 30 to 35 minutes. If crust is getting too brown, cover with foil.
15. Let pie cool for 3 hours at room temperature. When pressed for time, stick it in the fridge.
16. Revel in your sourdough awesomeness!!!


Wednesday, May 24, 2017

Wrapping Up School

I am so excited! School is almost over. I think I'm more excited than the boys are. I have so many plans and visions about what I'll do with my time off over the summer - baking, organizing, art with the boys, more baking, exploring, blogging, even more baking - copious amounts of BAKING!!!

The boys have been busy finishing up math and working on their final projects. They were tasked to research an animal of their choice and make a diorama of the animal's habitat. Ezra chose to do his project on black widows. Teo chose tigers.

The boys working on their animal reports.

We checked out some books from the library and the boys took notes while I read to them. Teo read some of his own books. ๐Ÿ’– Then we worked on their dioramas and their reports.


I think the boys had the most fun creating their animals. Mateo, of course, wanted no help. He created his tiger all on his own by rolling up orange paper that he had decorated with stripes. He used scotch tape to tape the parts together to form his tiger.


Ezra let me make suggestions for him and we worked together to glue some puff balls for the body and twisty ties for the legs onto a small round paper base to form his spider. Then he painted the whole thing black.


He also had a blast making a messy web with the glue gun. "Because black widows spin messy webs," he said. This was his first time using that coveted tool. It really made his day.


Mateo made grass and trees to add to his tiger habitat.


Ezra also made a bee trapped in the web for his black widow to dine on. He originally wanted to catch a real insect to put in there. I convinced him otherwise.

For the boys, these projects represent their own creativity, ideas, knowledge, and preferences. They are very proud of themselves and pleased with their projects - as they should be. For me, these projects represent the culmination of a year of hard work (on their part and mine), the amazing independent ideas of two sweet little boys come to life in recycled boxes, and the start of a much needed break from scheduled learning. 

We'll still learn over the course of the summer as we create together, bake together, explore together. It's just a different kind of learning - a restful and free-er kind of learning that happens on the fly - while we're exploring a new hiking trail, trying out a new recipe together to surprise Daddy for his birthday, stopping in at our local library to get books on camping or whatever topic is on the boys' minds that week, discussing what we know about rain forests over Sunday brunch at our favorite local restaurant. You know, on the fly. ๐Ÿ˜‰

Monday, May 22, 2017

What's for Dinner? Chile Verde Sheet Pan Nachos

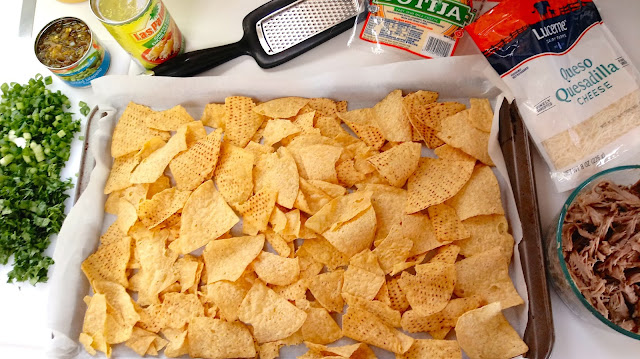
Nachos will be making frequent appearances on this blog. Surprise, surprise. It's not like it's my favorite food or anything. ๐Ÿ˜‰ It's also such an easy one pan dinner - and so very yummy. I have yet to try a version on the grill. Maybe that will be one of my goals this summer.


This version utilizes leftover pork carnitas. You can also buy some at your local supermarket in the deli section. I forget the brand just now, but they may even have a chile verde version.


I used "Queso Quesadilla" shredded cheese which I think is just a blend of typical cheeses used in Mexican food that melt well. You can also use Mexican blend or Monterey Jack shredded cheese. A must have ingredient for this pan of nachos is Cotija cheese. I grated some to melt with the Quesadilla cheese. I also grated some on top right before serving. It adds so much flavor.


After the nachos were done baking, I drizzled on green enchilada sauce and sour cream.


Then I sprinkled the whole pan with 1/2 a small can of jalapeรฑos, green onions, and cilantro.

If there was such a thing as an all star hall of fame for nachos, this version would definitely make the cut.


Chile Verde Sheet Pan Nachos

INGREDIENTS
1 bag corn tortilla chips
1 8 oz bag Queso Quesadilla shredded cheese or Mexican Blend or Monterey Jack
1/4 cup grated Cotija cheese, plus 1 or 2 Tbsp to be sprinkled on top
1 1/2 cups shredded pork carnitas
1 10 oz can green enchilada sauce or chile verde sauce
1/3 cup sour cream
2 oz canned jalapeรฑos (that's 1/2 of a 4 oz can)
1/4 cup sliced green onions
1/4 cup chopped cilantro

DIRECTIONS
1. Preheat oven to 400 degrees.
2. Line a large sheet pan with parchment paper and add a layer of corn chips.
3. Top with the whole bag of Queso Quesadilla and 1/4 cup Cotija.
4. Add shredded carnitas and bake about 10 minutes until cheese is good and melty.
5. Drizzle on about 3/4 of the can of green enchilada sauce and the sour cream.
6. Top with 2 oz canned jalapeรฑos, green onions, and cilantro.
7. Sprinkle with 1 or 2 Tbsp Cotija.
8. Serve with a huge smile.


Saturday, May 20, 2017

Woodworking: Kitchen Island

My husband made me a kitchen island this year.


It was a slow going project as his spare time is quite spare and very precious. I wish I had more pictures of the different stages to show you, but the boys some how factory reset Matthew's phone which had housed all those pics. Life with kids - and technology.

I absolutely love this island. It's beautiful. It's sturdy. It's rustic. It perfectly showcases all my prettiest dishes. And my hubby made it for me. I absolutely love it. Did I say that already?

You should have seen us trying to get this bad boy into the house. It is a solid piece of furniture. Just ask my back. ๐Ÿ˜ฌ

Matthew got the plans for this project from Ana White's website. She's got some really great plans for beginners.


Here are some of the details. We had some leftover teal colored wood stain from a dresser redo we did several years ago. Teal is my color yo. The frame got stained teal. The surfaces sport a gorgeous walnut colored stain. I love the contrast. The top is finished with a polyacrylic coating. We decided to leave the rest of the island unfinished. Not sure if that was the right decision. Time will tell, I guess.


My hubby also made the shed that he built my kitchen island in (I get to brag about him ๐Ÿ˜). He got his shed plans from shedking.net. I'll have Matthew write a guest post on that process some day. Although, he lost all of those pictures too. ๐Ÿ˜–

A coffee table for our living room is in the works as I write. It's also a slow going project. Hopefully, we'll get some good pics of that process and hang on to 'em. Wish us luck. ๐Ÿ˜‰


Friday, May 19, 2017

Gluten Free Peanut Butter S'more Cookies

Have you ever started making a recipe with a few tweaks in mind and then you find you've totally jumped off a cliff with the whole thing? That's how these delicious cookies came into being.


I had pinned a recipe for some fabulous looking gluten free chocolate chip cookies from My Gluten-Free Kitchen and was planning on replacing one of the ingredients in the dough and mixing in my favorite add-ins to make a peanut butter s'more cookie.


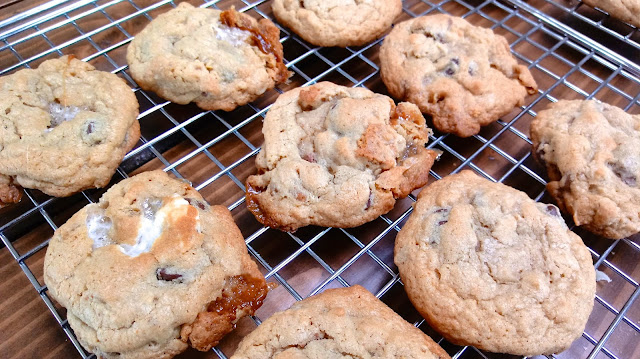
I used mini marshmallows, chopped Reese's peanut butter cups, dark chocolate chips, and broken up gluten free graham crackers.

I started off by using a little peanut butter in place of the cream cheese called for in the recipe and then some how ended up in no man's land. Actually, I do know how I got there.


First of all, I was replacing what may be a key ingredient in the cookie dough. I was willing to take that risk for the peanut butter nuance. Second, I had run out of granulated sugar, so I used all brown sugar, which made the cookies a little sweeter than they would be otherwise - but just a little. It is a cookie after all. Next, I forgot to only use egg yolks and ended up dumping in two whole eggs. I added in 1/2 cup of whole oats to compensate for the extra liquid. I also cut the vanilla by 1/3.


What was I thinking? I should have abandoned ship. Why was I going so rogue? Ah, but it's cookie dough. How can you abandon cookie dough? You gotta see it through, right? Even if you have to close your eyes and brace yourself for impact.

I am so glad I kept going. The end product ended up totally delish. A happy ending to a recipe fail that I single handedly derailed. It's a good thing I know how to steer this thing. Hee, hee, hee.

You can see the caramelized marshmallows oozing out the bottoms of some of these cookies.


A quick note about the marshmallows. I find it best to keep them off the pan towards the tops of the cookies. Otherwise they "caramelize" if touching the pan. Not horrible, but not preferable. After the first few batches I tried to scoop the dough so that the marshmallows were on top and not on the bottom where they could easily melt/burn and run all over the pan.

Not all mistakes in the kitchen are happy ones. Don't try this at home people. Actually, do. It's totally fun. 

I have yet to bake the original recipe I intended to try. Maybe some day.


Gluten Free Peanut Butter S'more Cookies

INGREDIENTS
2 1/4 cups gluten free flour blend containing xanthan/guar gum (I used Betty Crocker's All Purpose Gluten Free Rice Flour Blend)
1/2 cup whole oats
1 tsp salt
1 tsp baking soda
1/4 tsp cinnamon
3/4 cups unsalted butter, softened
1/4 cup all natural peanut butter
1 1/2 cups packed brown sugar
2 eggs
1 tsp vanilla extract
3/4 cup chopped Reese's peanut butter cups
3/4 cup dark chocolate chips
3/4 cup mini marshmallows
3/4 cup broken up gluten free graham crackers

DIRECTIONS
1. Preheat oven to 375 degrees and line your baking sheets with parchment paper.
2. Whisk together dry ingredients in a medium bowl and set aside.
3. Beat butter and peanut butter with a stand mixer for 30 seconds.
4. Beat in brown sugar until well combined.
5. Beat in eggs one at a time, scrape down bowl, and then beat in vanilla.
6. Add dry ingredients and mix on low until well combined.
7. Stir in last four ingredients.
8. Scoop onto prepared baking sheets using a small cookie scoop (about 2 Tbsp) 1 inch apart. Try to scoop the dough so that the marshmallows end up on top of the cookies and not on the bottom where they can easily burn on the pan.
9. Bake for 9 minutes.
10. Cool on pans for 3 or 4 minutes, then transfer to a cooling rack.

P.S. Sorry for all the "totally's" in this post. It was a "totally" kinda day.

Thursday, May 18, 2017

Field Trip: Monterey Bay Aquarium

We got the opportunity to go to the Monterey Bay Aquarium with our homeschool group this year. It was so great. It was the boys' first time. They absolutely loved it. Even Nora was a little trooper.

This was a few months ago. Nora looks so little.

That week I decided to tie our art class in with the field trip. I rolled out pieces of paper the length of our dining room table, handed the boys a box of crayons, and had them draw all of the creatures they saw at the aquarium.

Ezra drew Mateo and himself watching the fish.

Mateo really ran with this project. Ezra also enjoyed it and it proved a good exercise for him to try to recollect the things he saw.

More of Ezra's renditions.


Mateo's masterpiece.

After they were done with their creatures I pulled out the water colors so they could paint water all around them. Both boys loved that idea. It added a whole other dimension to their murals. They ended up gorgeous and totally wall worthy.

Tuesday, May 16, 2017

A Loverbee Staple: Sourdough

Follow my blog with Bloglovin

My poor sourdough starter has been through a lot with me for an owner. I had it sitting in a hot car for two days when we moved from Orange County to the Central Coast. I neglect it so very badly on a regular basis. I use it when I need to, feed it, and shove it to the back of my fridge where it sometimes sits for months without any attention. And still, it keeps on ticking. Yeast is amazing like that.

I made this little starter several years ago utilizing a few different websites including King Arthur Flour's. If you are a science person or a baking person or just love sourdough, I highly recommend making your own starter. It is soooooooooooo cool!!! Click here for a bunch of sourdough recipes from my Pinterest board to inspire you.

I've used my starter to make a variety of different sourdough bread recipes. My favorite recipe from Baking by James Peterson is pretty straight forward, akin to how most bakeries make their bread, and produces a lovely, fluffy, sour loaf. Unfortunately, it requires more time and effort than I would like to put into bread making at this point in my life.


The recipe I most often use is a "no knead" recipe that my neighbor passed along. There are a few different ways to do things. This is what I do.

Cinnamon raisin on the left, regular sourdough on the right.

I mix up my dough the night before I want to bake it, cover it with plastic wrap and a clean cloth, and leave it fermenting all night long.


Without kneading it, I transfer the dough to a buttered bread pan, cover with oiled plastic wrap, and leave to rise 2 to 4 hours or until it doubles in size.

The loaves then get baked with a little water bath below them to get an even rise and a nice crust.

I make other bread recipes on occasion too, but usually default to sourdough because I love sour and it's supposed to be good for your gut. Go gut health!!


No Knead Sourdough Bread

INGREDIENTS
3 1/4 cups all purpose unbleached flour
1 tsp salt
1 cup sourdough starter
1 cup very warm water

DIRECTIONS
1. In a large bowl, thoroughly mix ingredients until dough comes together.
2. Cover bowl with plastic wrap and lay a clean kitchen towel on top of that.
3. Let rise all night at room temperature (10 to 14 hours).
4. Butter a bread pan and scrape dough into pan.
5. Spray plastic wrap with a little oil spray and cover loaf.
6. Let rise 2 to 4 hours at room temperature or until doubled in size.
7. Preheat oven to 450 degrees and warm a large sheet pan on the bottom rack.
8. When oven is ready, pour 4 to 6 cups really hot water into sheet pan very carefully.
9. Place loaf on rack directly above water bath and bake about 50 minutes.
10. Immediately remove bread from pan onto a cooling rack to cool.
11. I keep my bread in a large ziplock bag in the fridge to keep it fresh for about a week.
12. I like to warm and soften up slices of bread in my toaster for sandwiches - 30 seconds or so should do the trick.

* For cinnamon raisin sourdough, mix in 2 tsp cinnamon and 3/4 cup raisins to the initial dough. Please note that your loaf will not rise as much as a regular sourdough loaf because of these add-ins.