Showing posts with label sourdough starter. Show all posts

Wednesday, December 27, 2017

Gorgonzola & Toasted Pecan Sourdough Wreath

2018 is just around the corner, folks! This last recipe of the year goes out to all my peeps with a sourdough starter. I just love fancy-ing up my sourdough for celebrations, and this braided wreath has New Year's Eve cocktail party written all over it. If you don't have a sourdough starter, fear not. You can still make this lovely bread. Just see the directions at the bottom of the recipe.

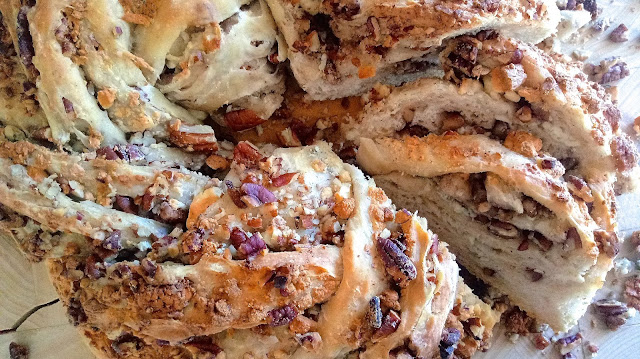
Gorgonzola & Toasted Pecan Sourdough Wreath on a cutting board with a few slices exposed
Elevate your holiday cheese tray with this gorgeous Gorgonzola & Toasted Pecan Sourdough Wreath!


This Gorgonzola and Toasted Pecan Sourdough Wreath is so festive. It's packed with chunks of Gorgonzola and loads of toasted pecans. It's also gorgeous and delicious and perfect for that New year's Eve cheese board.

sourdough mixture in a large stainless steel bowl


I started with the basic sourdough bread recipe I use to make bread. I mixed up the dough the night before and left it to ferment on the counter overnight.

sourdough rolled out into a large rectangle on a floured marble board


The next day I punched down the dough, rolled it out into a large rectangle, and covered it evenly with half a stick of very soft butter.

sourdough rolled out into a large rectangle on a floured marble board and sprinkled with chunks of Gorgonzola and toasted pecans


Then, I sprinkled on the cheese and pecans and pushed them down into the butter and dough.

sourdough filled with gorgonzola and pecans rolled up into a log on a floured marble board


Now comes the fun part. Roll into a long log and pinch the seam closed.

sourdough filled with gorgonzola and pecans rolled up into a log on a floured marble board


sourdough filled with gorgonzola and pecans rolled up into a log and cut in half on a floured marble board


Use a sharp knife to cut the roll in half lengthwise, exposing the goodies.

unbaked Gorgonzola & Toasted Pecan Sourdough Wreath on a floured marble board


Gently braid the two halves trying to keep the filling in the roll as best you can and then twist into a wreath tucking the ends underneath. It's okay if stuff falls out. I just pushed stray pieces of filling back into the dough.

a large clean white garbage bag containing the proofing Gorgonzola & Toasted Pecan Sourdough Wreath


Set on your baking sheet and put it in a proofing bag or large clean garbage bag to prevent a draft from drying out the surface.

proofed Gorgonzola & Toasted Pecan Sourdough Wreath sitting on a large baking sheet


After the wreath has almost doubled in size (about 2 to 4 hours at room temperature) bake at 400 degrees for 35 to 40 minutes.

a top shot of the Gorgonzola & Toasted Pecan Sourdough Wreath on a cutting board with a few slices cut


Wait about 15 minutes before you slice into your bread as the bread will continue to bake out of the oven.

a slice of Gorgonzola & Toasted Pecan Sourdough Wreath sitting upright on a cutting board exposing layers of nuts and cheese
Each slice of this Gorgonzola & Toasted Pecan Sourdough Wreath is studded with chunks of cheese and toasted nuts.


Packed with chunks of cheese and pecans in every slice, this show-stopping bread is bound to impress your new year's guests.

Gorgonzola & Toasted Pecan Sourdough Wreath

Ingredients
3 1/4 cups flour + about 1/2 cup more
1 tsp salt
1 cup sourdough starter
1 cup water
4 Tbsp unsalted butter, room temperature
6 oz crumbled Gorgonzola
2 cups toasted pecans, chopped

Directions
1. Mix 3 1/4 cups flour with the salt, sourdough starter, and water. Cover with plastic wrap and a clean towel and leave on the counter overnight.
2. The next morning, punch down the dough adding in more flour if your dough is too sticky. Roll out into a large rectangle and spread with butter leaving 1 inch of the length bare for the seam.
3. Sprinkle on the cheese and pecans and gently push them down into the butter and dough.
4. Roll into a long log ending at the bare edge and pinch the seam closed.
5. Roll log so that the seam is on the bottom and cut in half lengthwise using a sharp knife.
6. Gently braid the two halves trying to keep the filling in the dough. Then, twist into a wreath tucking the edges underneath.
7. Gently set on a baking sheet and place in a proofing bag or clean garbage bag to prevent a draft from forming a crust.
8. Proof 2 to 4 hours at room temperature or until almost doubled in size.
9. Preheat oven to 400 degrees. Bake for 35 to 40 minutes.
10. Allow bread to cool for 15 minutes before slicing.

If you don't have a sourdough starter you can find ready-to-use bread dough in your grocery store's freezer section. Thaw according to the package directions and skip to step 2.

Gorgonzola and Toasted Pecan Sourdough Wreath Pin 2

Saturday, May 27, 2017

Cherry Pie with Sourdough Crust

I made my first pie in ages because cherries are in season. Well, actually, I made it because I wanted to try this pie crust recipe using my sourdough starter - and because I wanted pie. I don't really need a reason though, do I?


My neighbor and I are sourdough sistas. We heart sourdough. 😍 She's been making pies using her sourdough starter for the past year or two. I finally gave it a try this week and have fallen head over heels for this pastry.


The recipe I used from Cultures for Health requires a good amount of fat. I used mostly butter with a little shortening.


The result is a super flaky, almost puff pastry like, texture. It doesn't taste like sourdough, but it does still give you all the benefits of those healthy little microbes. They break down the structure of the wheat flour so that it's easier to digest. Good for the gut. 👍


The dough ferments in a warm place for seven hours. Then it gets refrigerated for at least 4 hours until cold. That's how it turns out so flaky. All those fabulous chunks of cold fat melt and create the layers of pastry that give you that delicate, buttery, lightly crunchy mouth feel.


I have to say, it isn't a very pretty dough. The baked pie isn't very pretty either. I tried a batch of pastry where I tried to break down the fat a bit more, but there's just such a high fat to flour ratio that it really didn't make much difference.


Yay cherries! We love cherries up in here. I had to swat hands away as I prepped cherries for pie and jam. I got this cherry filling recipe from Sally's Baking AddictionThe little bit of almond extract she calls for is just wonderful.


Dotting the pie filling with a little bit of butter is a technique I've never understood but always followed. Just do it.


The pie bakes up a little monstrous. What it lacks in beauty it makes up for in deliciousness.

You'll need a sourdough starter for this recipe. If you don't already have one, you can start your own using instructions from King Arthur Flour. The process takes several days. You can also purchase one online or ask a friend who already has one. People with cultures love to share. Then you can chat about sourdough recipes and become sourdough sistas - or brothas - or whatevas.


Cherry Pie with Sourdough Crust
(See Cultures for Health and Sally's Baking Addiction for original recipes)

INGREDIENTS
2 cups flour
1 tsp salt
1 Tbsp sugar
1 cup unsalted butter, cold and cubed
1/2 cup shortening, cold and cubed
1 cup sourdough starter
4 1/2 to 5 cups pitted cherries
1/2 cup sugar
1/4 cup cornstarch
1 Tbsp lemon juice
1 tsp vanilla extract
1/4 tsp almond extract
1 Tbsp unsalted butter, cold and cubed small
1 large egg
1 Tbsp milk

DIRECTIONS
1. Prepare your sourdough pastry by combining 2 cups flour, 1 tsp salt, and 1 Tbsp sugar.
2. Cut in 1 cup butter and 1/2 cup shortening using a pastry cutter until you have big chunky crumbs.
3. Add sourdough starter a little at a time, stirring with a fork, just until dough starts to come together. This may take a cup, or less, or a little more. I know, vague, right? I ended up using about 3/4 of my cup. As soon as your dough starts clinging together, stop adding starter. (Quick note: Not adding enough starter will result in a dough that is hard to roll out and difficult to work with. In that case, use a generous amount of flour when rolling out. It won't fix the problem, but it will help.)
4. Once dough comes together, cover with plastic wrap and place a clean kitchen towel on top of that. Place in a warm place to ferment for 7 hours. I use my microwave with the oven light on low.
5. Then, refrigerate the dough for 4 hours or until cold.
6. Preheat oven to 400 degrees.
7. Prepare your filling by combining the cherries, 1/2 cup of sugar, cornstarch, lemon juice, vanilla, and almond extract in a medium bowl. Toss to combine and let sit to marinate while you roll out your dough.
8. Divide your cold dough in half and roll one half out on a floured surface. Line a standard pie plate with the dough and trim the edges.
9. Scoop your cherries with a slotted spoon into the crust leaving most of the liquid behind in the bowl. Dot filling with 1 Tbsp cold cubed butter.
10. Roll out second half of your dough and place on top of your filling. Trim the edges and tuck them in under the bottom crust all the way around. Crimp your edges with your fingers or a fork or whatever technique you like to use.
11. Place pie in freezer for 5 minutes.
12. Meanwhile, whisk together the egg and 1 Tbsp of milk to make an egg wash.
13. Brush pie with egg wash, cut slits on top to vent, and bake on a baking sheet to catch any drips for 20 minutes.
14. Reduce oven temperature to 375 degrees and bake another 30 to 35 minutes. If crust is getting too brown, cover with foil.
15. Let pie cool for 3 hours at room temperature. When pressed for time, stick it in the fridge.
16. Revel in your sourdough awesomeness!!!


Tuesday, May 16, 2017

A Loverbee Staple: Sourdough

Follow my blog with Bloglovin

My poor sourdough starter has been through a lot with me for an owner. I had it sitting in a hot car for two days when we moved from Orange County to the Central Coast. I neglect it so very badly on a regular basis. I use it when I need to, feed it, and shove it to the back of my fridge where it sometimes sits for months without any attention. And still, it keeps on ticking. Yeast is amazing like that.

I made this little starter several years ago utilizing a few different websites including King Arthur Flour's. If you are a science person or a baking person or just love sourdough, I highly recommend making your own starter. It is soooooooooooo cool!!! Click here for a bunch of sourdough recipes from my Pinterest board to inspire you.

I've used my starter to make a variety of different sourdough bread recipes. My favorite recipe from Baking by James Peterson is pretty straight forward, akin to how most bakeries make their bread, and produces a lovely, fluffy, sour loaf. Unfortunately, it requires more time and effort than I would like to put into bread making at this point in my life.


The recipe I most often use is a "no knead" recipe that my neighbor passed along. There are a few different ways to do things. This is what I do.

Cinnamon raisin on the left, regular sourdough on the right.

I mix up my dough the night before I want to bake it, cover it with plastic wrap and a clean cloth, and leave it fermenting all night long.


Without kneading it, I transfer the dough to a buttered bread pan, cover with oiled plastic wrap, and leave to rise 2 to 4 hours or until it doubles in size.

The loaves then get baked with a little water bath below them to get an even rise and a nice crust.

I make other bread recipes on occasion too, but usually default to sourdough because I love sour and it's supposed to be good for your gut. Go gut health!!


No Knead Sourdough Bread

INGREDIENTS
3 1/4 cups all purpose unbleached flour
1 tsp salt
1 cup sourdough starter
1 cup very warm water

DIRECTIONS
1. In a large bowl, thoroughly mix ingredients until dough comes together.
2. Cover bowl with plastic wrap and lay a clean kitchen towel on top of that.
3. Let rise all night at room temperature (10 to 14 hours).
4. Butter a bread pan and scrape dough into pan.
5. Spray plastic wrap with a little oil spray and cover loaf.
6. Let rise 2 to 4 hours at room temperature or until doubled in size.
7. Preheat oven to 450 degrees and warm a large sheet pan on the bottom rack.
8. When oven is ready, pour 4 to 6 cups really hot water into sheet pan very carefully.
9. Place loaf on rack directly above water bath and bake about 50 minutes.
10. Immediately remove bread from pan onto a cooling rack to cool.
11. I keep my bread in a large ziplock bag in the fridge to keep it fresh for about a week.
12. I like to warm and soften up slices of bread in my toaster for sandwiches - 30 seconds or so should do the trick.

* For cinnamon raisin sourdough, mix in 2 tsp cinnamon and 3/4 cup raisins to the initial dough. Please note that your loaf will not rise as much as a regular sourdough loaf because of these add-ins.