Wednesday, November 29, 2017

Advent Drawing Journal

This year the boys and I are drawing our way through Advent. My guys LOVE to draw and I wanted to really engage them as we prepare our hearts for Christmas as a family. So, I put together a simple printable book to take us through each day.

pages for the Advent Drawing Journal sprawled out on a table with a can of markers and color pencils next to them
This year we're drawing our way through Advent with this homemade Advent Drawing Journal.


Each page has a line for the scripture for the day, a box for drawing, and a few lines for jotting down any reflections we'll talk about together.

There are a few different lists of scriptures you could use for this project. I opted for my Anglican family prayer book's list:

Week 1 of Advent
Mark 13:33-37
Isaiah 2:1-5
Luke 10:21-24
Isaiah 25:6-9
Matthew 7:24-29
Psalm 27:1-6
Psalm 147:1-12

Week 2 of Advent
Isaiah 11:6-9
Isaiah 35:5-10
Matthew 18:12-14
Matthew 11:28-30
Matthew 11:7-10
Psalm 1
Psalm 80:1-3

Week 3 of Advent
Philippians 4:4-7
Psalm 25:1-8
Matthew 21:28-31a
Isaiah 45:5-8
Psalm 30
Isaiah 56:1
Luke 1:46-55

You could also use the traditional Catholic list of verses. If you want a more nativity focused story, you can use the list from John Piper's "Desiring God" website. I've left the top line of the journal page blank so you can insert the scripture readings of your preference.

Each day I'll read out the scripture reading for that day from a kid friendly version of the Bible, like the New Living Translation (you can use any translation you like). Then, we'll talk about what was read, what it might mean, what it has to do with Christmas, our thoughts and feelings, etc. After that, the boys will get a chance to draw and color anything they like having to do with the reading and our discussion. Finally, they'll write a couple of sentences about what they want to remember about that day's selection.

You can staple the book together or use a hole punch and weave in a pretty ribbon. Also, you may want to print the cover on cardstock. Here are my templates for printing:


Happy preparations y'all!

Advent Drawing Journal Pin

Monday, November 27, 2017

Fluffy Pumpkin Sourdough Dinner Rolls

I'm a sourdough fanatic. You may already know this about me. I've been converting some of my favorite bread recipes to sourdough starter only recipes in order to eliminate the use of any commercial yeast.

If you've been thinking of jumping on the sourdough band wagon, do it! It is so incredibly rad - and rewarding. You can get started on making your own sourdough starter with instructions from King Arthur Flour.

Lemme just take a second to get a little real with y'all. I used to be intimidated by recipes using yeast, much less a sourdough starter. Trust me when I say that it isn't rocket science. Also, bread dough is VERY forgiving. Keep reading to see some of my bread making imperfections.

a close up of the inside of a Fluffy Pumpkin Sourdough Rolls next to a bowl of soup
These Fluffy Pumpkin Sourdough Dinner Rolls are just perfect alongside any soup or stew.


These Fluffy Pumpkin Sourdough Dinner Rolls are soft and fluffy with subtle hints of pumpkin and spice, and a sourdough flavor that really shines through! They are tremendous slathered with salted butter and go perfectly with any soup or stew you can throw at 'em.

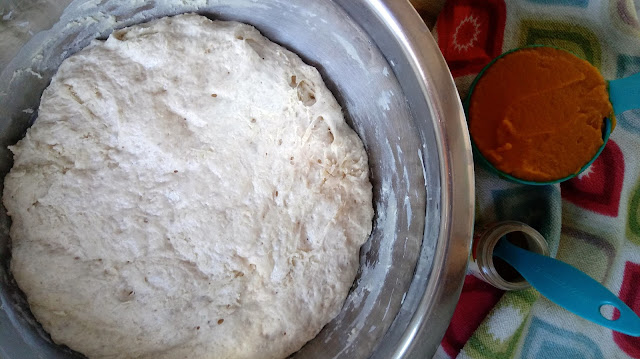
a bowl of sourdough sponge next to a cup of pumpkin puree and a jar of spice


I like to start my process the night before. The longer the dough ferments, the more sourdough flavor your bread will have. I mix up my sponge, cover it tightly, and leave it on the counter to do its thing overnight. The sponge will about double in size and smell delectably yeasty in the morning.

a ball of dough on a floured surface next to a scraper


Knead in the pumpkin, the pumpkin pie spice, and enough flour to make a workable dough. I ended up adding 2 more cups of flour. It just depends on how wet your pumpkin puree is.

pumpkin sourdough cut into pieces on a floured surface next to a bench scraper


Cut the dough into 4 "equal" pieces (as with most things, I just eyeball it). Then, cut each piece into 3 for a total of 12 rolls. My rolls were not all exactly the same size or shape - more or less is good enough for me.

With floured hands, roll each piece into a ball.

a buttered glass dish with unbaked Fluffy Pumpkin Sourdough Dinner Rolls

Place your rolls in a buttered pan, cover with plastic wrap, and let rise at room temperature for 2 to 4 hours, or in a warm place for 1 to 2 hours, or until doubled in size. Again, the slower the proof, the more sourdough flavor your rolls will have.

a close up of puffy proofed unbaked Fluffy Pumpkin Sourdough Dinner Rolls


As you can see, my kneading didn't get the pumpkin as thoroughly mixed in as it could have been. No biggie. The swirl is pretty and the rolls end up just as fluffy and pumpkin flavored as a thoroughly mixed dough.

a close up of baked Fluffy Pumpkin Sourdough Dinner Rolls


Bake the rolls at 400 degrees for about 25 minutes and then brush with melted butter.

Hope I've calmed any sourdough or bread making jitters. Give it a try! Experiment! You won't regret it.

Fluffy Pumpkin Sourdough Rolls sitting in a napkin lined bread basket
Just look at the fluffiness of these Fluffy Pumpkin Sourdough Dinner Rolls!


Fluffy Pumpkin Sourdough Dinner Rolls
(makes 12 large rolls)

INGREDIENTS
2 1/2 cups all purpose flour
1 Tbsp sugar
1 tsp salt
1 cup sourdough starter
3/4 cup water
1 tsp pumpkin pie spice
1 cup pumpkin puree
1 to 2 cups more flour
2 Tbsp melted salted butter

DIRECTIONS
1. Mix the first 5 ingredients to make the sponge. Knead a few minutes until ingredients are well incorporated. Cover with plastic wrap and a clean towel and leave to rise on your countertop overnight or for 7 hours.
2. Knead in the pumpkin puree, pumpkin pie spice, and enough flour to make a workable dough. I used about 2 cups more flour.
3. Use a sharp knife or a bench scraper to cut dough into 4 equal pieces. Then, cut each piece into 3 to make a total of 12 equal portions.
4. Roll each piece into a ball with floured hands.
5. Place rolls with the smoothest side up in a buttered 9 x 13 inch baking pan or dish, cover with plastic wrap, and let rise 2 to 4 hours, or until doubled in size. The rolls will rise faster in a warm place, but will have more sourdough flavor if they rise slower at room temperature.
6. Preheat oven to 400 degrees and bake for about 25 minutes.
7. Immediately brush tops with melted butter.

Fluffy Pumpkin Sourdough Dinner Rolls Pin

Saturday, November 25, 2017

Creamy Turkey and Mushroom Soup with Mushroom Ravioli

Thanksgiving leftovers are the best! They're already comfort food. They're also absolutely fabulous thrown into soups, stews, casseroles, and pies. Most years I make a big ol' pot of turkey, or creamy turkey, noodle soup. This year I thought I'd mushroom it up a little - okay, a lot. So I made a pot of Creamy Turkey and Mushroom Soup with Mushroom Ravioli.

a close up of a blue bowl filled with Creamy Turkey & Mushroom Soup with Mushroom Ravioli


a close up of a blue bowl filled with Creamy Turkey & Mushroom Soup with Mushroom Ravioli next to a couple of pumpkin rolls


This soup is packed with mushroom and roasted turkey flavor. A little bit of rendered bacon, some cream, and a sprinkling of Herbes de Provence don't hurt anything either. 😉

Ingredients for Creamy Turkey & Mushroom Soup with Mushroom Ravioli sitting on a red cutting board on top of a white counter top


The mushroom triple threat in this luxurious soup comes from baby portobellos cooked down with the mirepiox, a can of cream of mushroom soup stirred into the broth, and mushroom stuffed ravioli cooked in at the end. De-lish!

a large cast iron dutch oven with bacon cooking in it


Start by rendering two slices of bacon.

a large cast iron dutch oven with veggies cooking in it


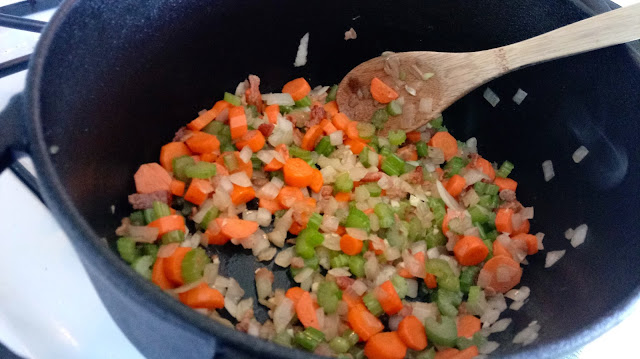
Then, cook the mirepiox in the bacon grease.

a large cast iron dutch oven with mushrooms and veggies cooking in it


Add in the mushrooms and cook until most of the liquid is gone. This concentrates that lovely mushroom flavor.

Creamy Turkey & Mushroom Soup with Mushroom Ravioli cooking in a large cast iron dutch oven


Turkey broth, cream of mushroom soup, roasted turkey, and seasonings get added to the pot and simmered for 15 minutes. The flavors meld together in a glorious symphony of mushroom and roasted turkey awesomeness.

a measuring cup filled with a slurry to thicken a pot of Creamy Turkey & Mushroom Soup with Mushroom Ravioli


finished Creamy Turkey & Mushroom Soup with Mushroom Ravioli in a large cast iron dutch oven


After that, the ravioli gets stirred in, and then the cream. Lastly, a slurry of cornstarch and broth gets added in to thicken up the soup a bit.

a bowl and two pumpkin rolls next to a large cast iron dutch oven full of soup


a close up of a blue bowl full of Creamy Turkey & Mushroom Soup with Mushroom Ravioli next to 2 pumpkin rolls


I served this soup with Fluffy Sourdough Pumpkin Rolls. Recipe coming soon!

Enjoy those leftovers everyone!

Creamy Turkey & Mushroom Soup with Mushroom Ravioli

INGREDIENTS
2 strips of bacon, diced
4 cups chopped mirepiox (onions, carrots & celery)
2 cloves garlic, minced
8 oz sliced baby portobello mushrooms
2 cups roasted turkey or chicken, chopped
1 to 1 1/2 tsp salt
1 tsp Herbes de Provence
1 10.5 oz can cream of mushroom soup
8 cups turkey or chicken broth
2 9 oz packages mushroom ravioli
1 cup whipping cream
1 Tbsp corn starch

DIRECTIONS
1. In a large dutch oven or soup pot, cook bacon over medium high heat until rendered and crispy.
2. Add mirepiox and cook until veggies are starting to brown. Add garlic and cook 1 minute.
3. Add in the mushrooms and cook until most of the liquid has evaporated.
4. Add in the broth, cream of mushroom soup, turkey, herbs, and 1 tsp of the salt. Bring to a boil. Cover and simmer for 15 minutes.
5. Add ravioli and cook for 4 minutes.
6. Stir in the cream.
7. Taste the soup and add up to 1/2 tsp more salt, or to taste.
8. Make a slurry by whisking together 1 Tbsp cornstarch and a little broth from the soup. Stir the slurry into the soup and bring to a boil. Then cook for 2 or 3 minutes until soup thickens a little.

Creamy Turkey & Mushroom Soup with Mushroom Ravioli Pin

Friday, November 17, 2017

Peanut Butter Banana Cream Pie

Oh me, oh my, it's banana cream pie! Well, actually, it's a Peanut Butter Banana Cream Pie... made with Nutter Butters. Uh, yeah!

Peanut Butter Banana Cream Pie sitting on a cake stand with a floral linen background
Meet this Thanksgiving's favorite cream pie - Peanut Butter Banana Cream Pie!


This pie is rich and creamy and packed with peanut butter and banana flavor. The pie starts with a buttery nutter butter crust, a layer of fresh and fragrant sliced banana, creamy dreamy banana cream pudding, more sliced banana, crumbled Nutter Butters, luscious peanut butter whipped cream, and more crumbled Nutter Butters. Whew! That's a mouthful.

Okay, let's make the crust.

Nutter Butter cookies sitting in a food processor


Nutter Butter cookie crumbs sitting in a food processor


Put 20 Nutter Butters in a food processor to make crumbs.

an unbaked Nutter Butter pie crust on a counter top next to a mixing bowl and towel


Add 4 tablespoons of melted butter and press into your pie dish. Bake for 8 minutes and cool completely.

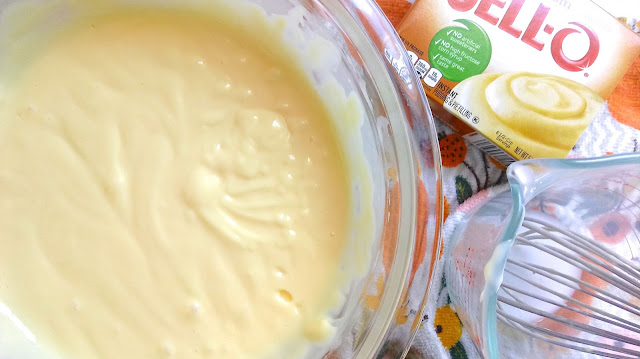
a bowl of banana cream pudding next to a measuring cup and box of pudding mix


Whip up your pudding.

a layer of sliced bananas on a Nutter Butter pie crust sitting on a rustic baking sheet


a layer of banana pudding on top of bananas in a Nutter Butter crust sitting on a rustic baking sheet


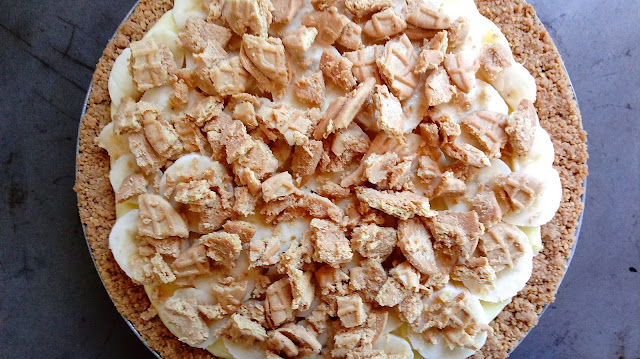
a layer of crumbled Nutter Butter cookies on top of sliced bananas and banana cream pudding in a Nutter Butter pie crust sitting on a rustic baking sheet


Lay down a layer of sliced bananas, pour in the pudding, lay down more sliced banana, and crumble some Nutter Butters on top of that.

peanut butter whipped cream heaped onto the Peanut Butter Banana Cream Pie
Creamy dreamy peanut butter whipped cream tops this decadent Peanut Butter Banana Cream Pie.


Now, whip up that luscious peanut butter whipped cream. I used a natural peanut butter, but any pb will do. Heap the cream onto your pie and spread evenly.

finished Peanut Butter Banana Cream Pie sitting on a rustic baking sheet


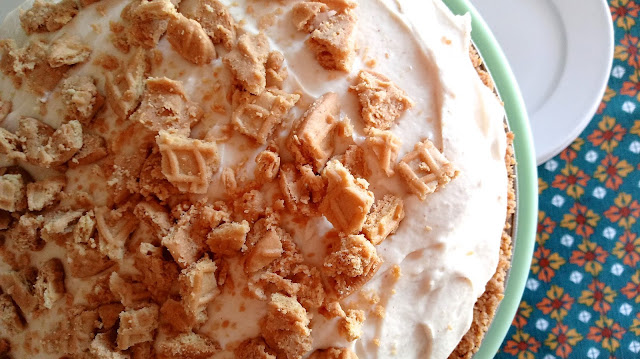
Crumble some more Nutter Butters on top and refrigerate a few hours until set.

If you like cream pie on your Thanksgiving dessert table, then this is a must-make!

Happy Thanksgiving y'all!

Peanut Butter Banana Cream Pie
(makes 1 deep dish pie)

INGREDIENTS
16 oz package Nutter Butter sandwich cookies, divided
4 Tbsp melted butter
5.1 oz packet banana cream pudding/pie filling
2 1/2 cups cold whole milk
3 large bananas, sliced in 1/4 inch slices
1 pint whipping cream
1/4 cup peanut butter
1 Tbsp vanilla pudding mix
1/3 cup powdered sugar
1 tsp vanilla extract

DIRCTIONS
1. Preheat oven to 350 degrees.
2. Zap 20 Nutter Butters in a food processor to make crumbs. Mix in melted butter and press into a deep dish pie tin/plate.
3. Bake for 8 minutes and then allow to cool completely.
4. Whisk banana pudding mix with cold milk for 3 to 5 minutes until thick.
5. Line the bottom of your cooled crust with banana slices and pour in the pudding. Top with another layer of banana slices and then crumble about 4 or 5 more Nutter Butters over the slices. Set in the fridge while you make the whipped cream.
6. In a stand mixer, use the whisk attachment to whisk together the whipping cream, peanut butter, Tbsp of vanilla pudding mix, powdered sugar, and vanilla extract. Start low. As the cream thickens, increase to high and whisk until stiff peaks form. Keep an eye on it so as not to over-whip.
7. Pile the peanut butter cream on top of your pie and spread evenly.
8. Crumble a few more Nutter Butters on top.
9. Refrigerate pie for 2 to 4 hours until firm and set.
10. Keep refrigerated.

Peanut Butter Banana Cream Pie Pin

Tuesday, November 14, 2017

Easy Maple Ice Cream for Pie

Life is full of pie over here at the Loverbee house. Pie, pie, a whole lotta pie. What can I say? It's pie season! Most of our clan are pie and ice cream folk. Me? I can take it or leave it - the ice cream, that is. But if there's maple ice cream in the house, you better believe it's going on my pie.

a container filled with homemade maple ice cream with an ice cream scoop in it next to a pie
Take pie à la mode to a whole new level with this Easy Maple Ice Cream.

This homemade Maple Ice Cream takes pie à la mode to a whole new level - and it's so easy to make. It's rich, it's creamy, and that maple flavor will send you over the moon for pie and ice cream. It goes just perfectly with any fruit pie, crisp, or cobbler. Move over boring vanilla. You've been topped.

I prefer the flavor of maple flavored syrup over pure maple syrup in this ice cream. But that's just me. It gives the ice cream more of that maple bar flavor that I'm totally addicted to. Pure maple syrup is also delicious and what Matthew prefers. You can give both versions a try and decide for yourself.

Ingredients for Easy Maple Ice Cream for Pie prepped and sitting on a pumpkin towel


A jar full of Easy Maple Ice Cream Mix for Pie


Are you ready to see just how easy this is? Okay, pour all of the ingredients into a quart size jar, screw on the lid nice and tight, and shake till the ingredients are all blended together. So easy! If your ingredients are already super cold, you can pour your mixture straight into your ice cream maker.


I like to put my ice cream container in the freezer while my ice cream churns. Then, I spread it in, cover with foil, and freeze for 4 hours or so.

Step aside boring ol' vanilla. Easy Maple Ice Cream is in da house!


When you're ready to scoop, take the ice cream out and let it sit on the counter for 10 minutes to soften up a bit.

Easy Maple Ice Cream for Pie

INGREDIENTS
1 pint whipping cream
3/4 cup whole milk
1/2 cup maple flavored syrup or pure maple syrup
a hefty pinch of Kosher salt

DIRECTIONS
1. Make sure your ice cream maker's freezing component is frozen.
2. Pour all ingredients in a quart size jar, screw on the lid, and shake until blended. Leave in the fridge for 2 to 4 hours until very cold, unless all of your ingredients were already super cold.
3. Pour mixture in your ice cream machine and churn according to your machine's manual. Mine usually takes about 10 to 15 minutes.
4. Scoop into a freezer safe container, cover, and freeze for 4 hours.
5. Take out your ice cream and leave it on the counter to soften for 10 to 15 minutes before scooping.

Easy Maple Ice Cream for Pie Pin At Home with the Loverbees

Saturday, November 11, 2017

Carrot Cardamom Pie with Pistachio Cardamom Whipped Cream

Indian food is my very favorite. When my hubby suggested a carrot pie I turned to my favorite Indian dessert for inspiration - spiced carrot pudding. Ever had it? It's like a rice pudding made with shredded carrot instead of rice. Carrots are cooked down with sugar, milk, golden raisins, and cardamom to make a gorgeous pudding that's garnished with nuts. It's totally delish. These are the fabulous flavors I put into my Carrot Cardamom Pie with Pistachio Cardamom Whipped Cream.

Carrot Cardamom Pie with Pistachio Cardamom Whipped Cream sitting on a rustic baking sheet
Take Thanksgiving to the next level with my Carrot Cardamom Pie and Pistachio Cardamom Whipped Cream.


This Carrot Cardamom Pie is just as creamy and sweet as any ol' pumpkin or sweet potato pie. Roasting the carrots brings out their natural sweetness, and the cardamom adds a happy surprise of exotic autumn flavor to the custard. Oh, and the pistachio cardamom whipped cream? It really is something special. You may end up squirting half the piping bag down your throat. Save some for the pie, will ya!

a sheet pan of roasted carrots


Start by roasting yourself about 8 large carrots.

pureed carrots in a food processor


Once cooled, zap them in a food processor until pureed. You may need to stop your machine and push down the contents a few times.

blind baked sourdough pie crust on a rustic baking sheet


I used a sourdough pastry shell for my pie, but a regular one will do just fine - just make sure it's deep dish. I blind baked my crust for 15 to 20 minutes to avoid a soggy bottom.

unbaked Carrot Cardamom Pie sitting on a rustic baking sheet
baked Carrot Cardamom Pie sitting on a rustic baking sheet


Mix up your carrot custard and pour into your cooled crust. Wrap foil gently around the edges of the pie and bake for 20 minutes. Then, remove the foil and bake another 25 to 30 minutes until a knife inserted in the center comes out clean.

baked and finished Carrot Cardamom Pie with Pistachio Cardamom Whipped Cream
Get foodie fancy with this Carrot Cardamom Pie and Pistachio Cardamom Whipped Cream.


When your pie is completely cool, make your whipped cream and pipe pretty swirls all around it. Or, you can just heap it all on top like a cream pie. This recipe makes a stabilized whipped cream, so you don't have to worry about it turning into a puddle as it sits on your dessert table.

a close up of the Carrot Cardamom Pie with Pistachio Cardamom Whipped Cream
Pretty swirls of Pistachio Cardamom Whipped Cream top this foodie fabulous Carrot Cardamom Pie.
Go "foodie" this Thanksgiving by serving this spin on the classic pumpkin pie and amaze your guests with the delectable flavors of cardamom and pistachio.

Carrot Cardamom Pie with Pistachio Cardamom Whipped Cream on a cake plate with a slice in the background


Carrot Cardamom Pie with Pistachio Cardamom Whipped Cream
(makes 1 deep dish pie)

INGREDIENTS
For the Carrot Cardamom Pie:
about 8 to 10 large carrots
olive oil to coat
1 deep dish single pie crust (I used sourdough pastry)
4 large eggs
3/4 cup sugar
1 tsp cardamom
1/2 tsp cinnamon
12 oz evaporated milk

For the Pistachio Cardamom Whipped Cream:
1 pint whipping cream
1 Tbsp pistachio pudding mix
1/3 cup powdered sugar
a scant 1/2 tsp almond extract
1/4 tsp cardamom

another 1/4 tsp cardamom to garnish

DIRECTIONS
1. Preheat oven to 425 degrees, line a large baking sheet with foil and lightly grease.
2. Peel and cut carrots into similar sized pieces so they roast evenly. Toss them with a little olive oil, dump onto baking sheet, and roast for 30 to 45 minutes or until a knife easily slides into the chunks.
3. Allow carrots to cool and lower oven temp to 375 degrees.
4. Blind bake your crust. Line the crust with foil, fill with 1 lb dry beans, and bake for 15 minutes. Remove foil and beans, push down any puffiness, and bake another 5 minutes. Allow crust to cool for 10 to 15 minutes. Raise the oven temp to 400 degrees.
5. When carrots are cool enough, put them in a food processor and process until you have a puree. I had to stop the machine and push the mixture down several times.
6. Weigh out 15 oz of carrot puree (or about 1 1/2 cups) and place in a bowl.
7. Beat the eggs into the puree and then beat in the rest of the pie ingredients using a whisk.
8. Pour the custard into your cooled crust and lightly wrap the edges with foil. Bake for 20 minutes. Remove the foil and bake another 25 to 30 minutes or until a knife inserted in the center comes out clean. If the edges look too brown as the pie bakes, cover them again with foil.
9. Allow pie to cool completely.
10. Beat all of the ingredients for the whipped cream until stiff peaks form.
11. Pipe rosettes or simple puffs all around the pie, sprinkle a little cardamom over the cream, and serve with any leftover whipped cream. You can also just pile all of the whipped cream onto the pie at once for a more cream pie kinda look.

Carrot Cardamom Pie with Pistachio Cardamom Whipped Cream Pin