We gave my mom an early Mother's Day present when we were down to see her over spring break. That worked out great, because this blog post would have totally spoiled her surprise.
My parents are becoming empty nesters and my mom just converted one of the bedrooms in her house into a sewing and craft room.
What better way to celebrate her new craft room than with a craft of our own to help her decorate? The boys and I revamped an old lamp shade with handmade flowers and ribbons for her new room.
I chose a simple flower that would be easy for the boys to make. They started with spirals that they rolled up into flowers. Super easy for little fingers. We used both felt and paper.
Mama was in charge of the hot glue gun for this project. I glued on the ribbons while the boys rolled their flowers. Then they picked which ones they wanted to put where. I put the dots of glue with the glue gun and they stuck on their flowers and leaves.
These cute little flowers can go on all sorts of crafts. Hot glue them onto a card, headband, wreath, napkin rings, etc.
Here is the template we used.
After cutting out the circles, cut along each spiral until you get to the center. Then, roll your flowers starting with the center and wrapping the length of the spiral around it forming a sort of cone shape. Continue wrapping and secure the end to the outermost part of your flower with a small drop of glue.
By the way, Grandma loved her surprise.
Sunday, April 30, 2017
Friday, April 28, 2017
In Search of the Perfect Picnic: Wildflowers II
We went back to see the wildflowers last weekend. This time we took my mother and sister-in-law with us. As is my way, I was a woman on a mission to create the perfect picnic menu. Rather than working to impress my picnic guests my goal is always to indulge them and to make them feel super special and super loved. I'm pretty sure I reached my goal this time around. 😉
On top of that, our guests showed up with some beautiful pink grapefruit that I incorporated into a lemonade with honey. I love honey with grapefruit. It turned out super yummy. I had to stop myself from gulping down half the jug right after I made it. I'm gonna have to put the rest of those beauties to good use.
We drove out to the wildflowers only to find that most of them had already died off and the fields were starting to turn brown.
There were still a couple of varieties left, and the wildlife did not disappoint.
We encountered a baby rattle snake crossing the road as soon as we got out of our cars. This is a zoomed in pic. We didn't actually get that close. Apparently, baby rattle snakes aren't good at controlling their venom so they are more dangerous than adult rattlers. Trust me, we kept our distance.
The boys became entirely preoccupied with catching big fat tadpoles out of the creek.
We also found a stink bug to follow around for a while.
My sister-in-law brought us a lovely nature press book. The boys were more interested in catching tadpoles than picking flowers, but I put the press to good use anyway.
I wanted light and refreshing flavors with hints of herbs for this springtime picnic. I settled on a menu of BBQ Rosemary Lemon Chicken and three picnic salads - Creamy Cucumber Dill Salad, Chickpea and Red Cabbage Picnic Salad, and Honey & Lime Marinated Fruit Salad.
I also made a batch of Oatmeal Chocolate Chocolate Chip Cookies and a pitcher of Lavender & Vanilla Earl Grey Iced Tea. These cookies are a gluten free recipe and bake up soft but are full of chocolaty flavor. The iced tea is gorgeous - a real picnic treat.
I set up shop in the trunk of our car tailgate style. |
On top of that, our guests showed up with some beautiful pink grapefruit that I incorporated into a lemonade with honey. I love honey with grapefruit. It turned out super yummy. I had to stop myself from gulping down half the jug right after I made it. I'm gonna have to put the rest of those beauties to good use.
We drove out to the wildflowers only to find that most of them had already died off and the fields were starting to turn brown.
There were still a couple of varieties left, and the wildlife did not disappoint.
We encountered a baby rattle snake crossing the road as soon as we got out of our cars. This is a zoomed in pic. We didn't actually get that close. Apparently, baby rattle snakes aren't good at controlling their venom so they are more dangerous than adult rattlers. Trust me, we kept our distance.
The boys became entirely preoccupied with catching big fat tadpoles out of the creek.
We also found a stink bug to follow around for a while.
My sister-in-law brought us a lovely nature press book. The boys were more interested in catching tadpoles than picking flowers, but I put the press to good use anyway.
So, that wraps up our wildflower picnics for the year. Now on to summer picnics. 😉
INGREDIENTS
The strained juice of 3 large lemons
1/4 cup olive oil
2 Tbsp dried rosemary or 1/4 cup fresh rosemary
2 cloves garlic, minced
2 tsp salt
1/2 tsp fresh ground pepper
12 piece pack of chicken legs and thighs
DIRECTIONS
1. Combine marinade ingredients in a medium bowl and whisk to combine.
INGREDIENTS
2 cups strawberries, sliced
1 pint raspberries
1 pint blackberries
4 kiwis, peeled, halved longways, then sliced
1 cup green grapes, halved
4 cuties, segmented
1/2 fresh pineapple, diced
1 Tbsp honey
1 lime, juiced
DIRECTIONS
1. Combine fruit in a large bowl.
2. In a small bowl, whisk together honey and lime juice. Add to fruit and toss gently to coat.
3. Refrigerate for a few hours to allow flavors to meld.
INGREDIENTS
2 large cucumbers, peeled and sliced
1/4 cup thinly sliced red onion or 3 shallots
1 cup Greek yogurt
1/4 cup raw apple cider vinegar
1/4 cup sugar
1/4 tsp salt
1/4 tsp fresh ground pepper
1/4 tsp dried dill
DIRECTIONS
1. Combine last six ingredients in a medium bowl and whisk together.
2. Add cucumber and onion and toss to coat.
3. Refrigerate covered for a few hours to allow flavors to meld.
INGREDIENTS
1 small head red cabbage, shredded
1 16 oz can chickpeas, rinsed and drained
1/2 cup sliced green olives
3/4 cup shredded or shaved Parmesan cheese
1/4 cup sunflower seeds
4 Tbsp balsamic vinegar
3 Tbsp olive oil
1/4 tsp salt
1/8 tsp fresh ground pepper
DIRECTIONS
1. Place first 5 ingredients in a medium bowl.
2. In a small bowl, whisk together last 4 ingredients. Dump into veggie bowl and toss to coat.
3. Taste and add additional salt, pepper, and/or vinegar according to your taste.
4. Refrigerate a few hours for flavors to meld.
Oatmeal Chocolate Chocolate Chip Cookies
(Original recipe by Beaming Baker)
INGREDIENTS
2 Tbsp flax seed meal
6 Tbsp water
1/4 cup + 2 Tbsp coconut oil, melted
1/4 cup sugar
1/4 cup pure maple syrup
1 tsp vanilla extract
1 1/4 cups oat flour (I made my own by grinding whole oats in a food processor and then measuring out the flour)
1/4 cup cocoa powder
1/2 tsp baking soda
1/2 tsp baking powder
1/4 tsp salt
Heaping 1/2 cup dark chocolate chips + a Tbsp or two to press onto tops
DIRECTIONS
1. Make flax eggs by whisking together the flax meal and water in a large bowl. Let rest for 10 minutes.
2. In a medium bowl, stir together dry ingredients.
3. In your flax bowl, add the rest of the wet ingredients and stir well.
4. Dump dry ingredients into wet and stir well to combine.
5. Fold in the heaping 1/2 cup chocolate chips, cover and let rest 10 minutes.
6. Meanwhile, preheat oven to 350 degrees and line two baking sheets with parchment paper.
7. Use a 2 Tbsp cookie scoop to scoop cookie dough onto baking sheets. Flatten cookies with your fingers to desired flatness as they will not spread much during baking. Press in a couple of additional chocolate chips on top of each cookie.
8. Bake about 10 minutes.
9. Cool on baking sheet for 5 minutes and then transfer gently onto a cooling rack.
INGREDIENTS
1 cup granulated sugar
1 cup honey
2 cups water
4 or 5 lemons, juiced
2 large pink grapefruit, juiced
2 to 4 more cups water
DIRECTIONS
1. Make the simple syrup. In a small saucepan heat sugar, honey, and 2 cups water over low heat until sugar is dissolved, stirring frequently. Cool.
2. Strain your citrus juice into a pitcher or jug.
3. Stir in 2 cups of your honey simple syrup.
4. Stir in 2 cups water.
5. Taste and add in more water and/or simple syrup to taste.
BBQ
Rosemary Lemon Chicken
INGREDIENTS
The strained juice of 3 large lemons
1/4 cup olive oil
2 Tbsp dried rosemary or 1/4 cup fresh rosemary
2 cloves garlic, minced
2 tsp salt
1/2 tsp fresh ground pepper
12 piece pack of chicken legs and thighs
DIRECTIONS
1. Combine marinade ingredients in a medium bowl and whisk to combine.
2. Place chicken in a large Ziploc bag and pour in marinade. Seal bag with as little air as possible and massage marinade into chicken pieces.
3. Marinate in fridge for 1 to 2 hours.
4. Grill over a medium flame about 30 minutes or until fat is rendered and chicken is cooked through, turning a few times. If your grill has hot spots, make sure you rotate your chicken pieces accordingly.
3. Marinate in fridge for 1 to 2 hours.
4. Grill over a medium flame about 30 minutes or until fat is rendered and chicken is cooked through, turning a few times. If your grill has hot spots, make sure you rotate your chicken pieces accordingly.
Honey
& Lime Marinated Fruit Salad
INGREDIENTS
2 cups strawberries, sliced
1 pint raspberries
1 pint blackberries
4 kiwis, peeled, halved longways, then sliced
1 cup green grapes, halved
4 cuties, segmented
1/2 fresh pineapple, diced
1 Tbsp honey
1 lime, juiced
DIRECTIONS
1. Combine fruit in a large bowl.
2. In a small bowl, whisk together honey and lime juice. Add to fruit and toss gently to coat.
3. Refrigerate for a few hours to allow flavors to meld.
Creamy
Cucumber Dill Salad
INGREDIENTS
2 large cucumbers, peeled and sliced
1/4 cup thinly sliced red onion or 3 shallots
1 cup Greek yogurt
1/4 cup raw apple cider vinegar
1/4 cup sugar
1/4 tsp salt
1/4 tsp fresh ground pepper
1/4 tsp dried dill
DIRECTIONS
1. Combine last six ingredients in a medium bowl and whisk together.
2. Add cucumber and onion and toss to coat.
3. Refrigerate covered for a few hours to allow flavors to meld.
Chickpea
& Red Cabbage Picnic Salad
(Original recipe from Simply Recipes)INGREDIENTS
1 small head red cabbage, shredded
1 16 oz can chickpeas, rinsed and drained
1/2 cup sliced green olives
3/4 cup shredded or shaved Parmesan cheese
1/4 cup sunflower seeds
4 Tbsp balsamic vinegar
3 Tbsp olive oil
1/4 tsp salt
1/8 tsp fresh ground pepper
DIRECTIONS
1. Place first 5 ingredients in a medium bowl.
2. In a small bowl, whisk together last 4 ingredients. Dump into veggie bowl and toss to coat.
3. Taste and add additional salt, pepper, and/or vinegar according to your taste.
4. Refrigerate a few hours for flavors to meld.
* I personally think a little bit of sugar whisked in to the dressing would make it even better. I wouldn't mind a little red onion either. I have yet to try it.
Oatmeal Chocolate Chocolate Chip Cookies
(Original recipe by Beaming Baker)
INGREDIENTS
2 Tbsp flax seed meal
6 Tbsp water
1/4 cup + 2 Tbsp coconut oil, melted
1/4 cup sugar
1/4 cup pure maple syrup
1 tsp vanilla extract
1 1/4 cups oat flour (I made my own by grinding whole oats in a food processor and then measuring out the flour)
1/4 cup cocoa powder
1/2 tsp baking soda
1/2 tsp baking powder
1/4 tsp salt
Heaping 1/2 cup dark chocolate chips + a Tbsp or two to press onto tops
DIRECTIONS
1. Make flax eggs by whisking together the flax meal and water in a large bowl. Let rest for 10 minutes.
2. In a medium bowl, stir together dry ingredients.
3. In your flax bowl, add the rest of the wet ingredients and stir well.
4. Dump dry ingredients into wet and stir well to combine.
5. Fold in the heaping 1/2 cup chocolate chips, cover and let rest 10 minutes.
6. Meanwhile, preheat oven to 350 degrees and line two baking sheets with parchment paper.
7. Use a 2 Tbsp cookie scoop to scoop cookie dough onto baking sheets. Flatten cookies with your fingers to desired flatness as they will not spread much during baking. Press in a couple of additional chocolate chips on top of each cookie.
8. Bake about 10 minutes.
9. Cool on baking sheet for 5 minutes and then transfer gently onto a cooling rack.
Lavender
& Vanilla Earl Grey Iced Tea
INGREDIENTS
5 bags Earl Grey tea
1 Tbsp dried culinary lavender
8 cups of water divided
2 tsp vanilla extract
DIRECTIONS
1. Place tea bags and lavender in a heat proof bowl or jug.
2. Boil 4 cups of water and pour over tea. Let steep for 20 minutes.
3. Strain into pitcher or jug, add vanilla and 4 more cups cold water. Stir to combine.
4. Refrigerate until cold.
Pink
Grapefruit & Honey Lemonade
INGREDIENTS
1 cup granulated sugar
1 cup honey
2 cups water
4 or 5 lemons, juiced
2 large pink grapefruit, juiced
2 to 4 more cups water
DIRECTIONS
1. Make the simple syrup. In a small saucepan heat sugar, honey, and 2 cups water over low heat until sugar is dissolved, stirring frequently. Cool.
2. Strain your citrus juice into a pitcher or jug.
3. Stir in 2 cups of your honey simple syrup.
4. Stir in 2 cups water.
5. Taste and add in more water and/or simple syrup to taste.
Wednesday, April 26, 2017
PB & J Granola Volcanoes
Ezra is my little science guy. Mateo likes science too, but Ezra is on a science kick. He watches Sid the Science Kid over and over. He fills my mason jars with all kinds of things in the name of estimation and revels in discussing decay.
At the end of the last day of a long week, with a jar of homemade strawberry jam in his hand, he asks me if I can help him make a volcano. We've made one before - one of those erupting ones with baking soda and vinegar. I didn't have the heart to say no, especially when he has been so enthusiastic about science. That same day he had taken another one of my jars, filled it with ice, and put it out on the porch to see how long it would take the ice to melt. I gotta get this kid a science journal.
Anyway, I said yes. Since he wanted to use jam for the lava I suggested we make mini volcanoes out of peanut butter granola.
I used a simple no bake granola recipe from Life Made Sweeter. It comes together in a flash.
The boys pressed the sticky concoction into little volcanoes.
We popped them into the freezer for an hour or so to firm up. Then the boys filled them with a couple of teaspoons of homemade strawberry jam making sure to let some of it trickle down the sides like lava.
These little volcanoes bare a slight resemblance to bloody stumps (forget I said that), but they are so good. They were a little too sweet for me so I think I'll "experiment" with putting in 1/3 cup honey next time instead of the 1/2 cup the recipe calls for. Hopefully it will still stick together okay.
I highly recommend adding a dash of cinnamon to the peanut butter granola. Throw in the tart strawberry jam and you have a match made in heaven. My homemade jam is a quick recipe that cooks up much looser than store-bought, but we all like it and it worked great for this tasty treat. I use this recipe to mix and match whatever fruit is in season and store my jars in the freezer instead of going through the whole canning process. I also love that I can manipulate how much sugar to add when I cook up a batch.
PB
& J Granola Volcanoes
INGREDIENTS
2
1/3 cups whole oats
1/3
cup + 2 Tbsp almond meal
1/3
cup unsweetened coconut
pinch
of salt
dash
of cinnamon
2/3
cup peanut butter
½
cup honey (maybe less)
1
tsp vanilla
½
cup strawberry jam (my homemade recipe follows)
DIRECTIONS
1.
In a large bowl combine dry ingredients.
2.
In a microwave safe bowl combine peanut butter and honey and
microwave 30 seconds. Add vanilla and stir well to combine.
3.
Add peanut butter mixture to oat mixture and stir until well coated.
4.
Take 1/3 cup portions and form into volcanoes with a hole in the
center that doesn't go all the way through (otherwise your jam will
leak out the bottom). You also want to press the granola together firmly so that it packs together tightly.
5.
Freeze for an hour until firm.
6.
Fill each volcano with about 2 tsp jam letting some drip over the
side.
Homemade
Strawberry Jam
(Original recipe from Scattered Thoughts of a Crafty Mom)
INGREDIENTS
16
oz strawberries, hulled and sliced
½
cup to ¾ cup sugar
2
Tbsp lemon or lime juice, fresh or bottled
DIRECTIONS
1.
Heat all ingredients in a medium heavy bottomed pot on medium high
heat.
2.
When mixture comes to a boil, set a timer for 10 minutes.
3.
Stir occasionally and smash strawberries against side of pot with a
wooden spoon. Lower heat if jam looks in danger of boiling over.
4.
Cool completely and pour into jars. Store in fridge or freeze.
* This recipe is easily doubled.
Thursday, April 20, 2017
What's for Dinner? Sheet Pan Italian Sausage & Peppers
Despite a few set backs over spring break, the hubbs and I are eating lower carb these days in an effort to lose 30 pounds of, let's call it, baby weight. So far, so good. Matthew's down about 10 pounds and I'm almost down 20.
Meat and veggie dishes are my go to's during this slimming down season. Also, I am all about the one pan oven dishes. With homeschooling, and a baby girl, and a house that won't clean itself (as hard as I wish) one pan wonders are the best.
When making one pan dishes you want to make sure that everything cooks evenly and that it's all done at the same time. Otherwise, you'll have to remove the done items from your pan and stick it back in the oven to continue cooking whatever isn't cooked. Not the end of the world, but why make more work for yourself than you have to. Also, whatever you take out will be sitting there getting cold without efforts on your part to keep it warm while it's waiting for its roasting compadres. Again, more work.
In this dish, the Italian sausages need about 40 minutes to roast. Taking that into account I quarter my onion leaving it in huge chunks so they don't burn while the sausages are get'n done.
Same with the bell peppers. They should be quartered or cut into really big chunks so they don't end up mushy (unless you like mushy). The pepper pieces pictured here could have been a little bigger.
I let the sausages roast for 30 minutes, then turn them and roast another 10 minutes. Perfection.
On a side note, if you aren't trying to eat low carb, go ahead and scoop this dish into beautifully toasted and buttered hoagie rolls, top with provolone cheese, and melt under the broiler for 2 minutes or so. 😉
Meat and veggie dishes are my go to's during this slimming down season. Also, I am all about the one pan oven dishes. With homeschooling, and a baby girl, and a house that won't clean itself (as hard as I wish) one pan wonders are the best.
When making one pan dishes you want to make sure that everything cooks evenly and that it's all done at the same time. Otherwise, you'll have to remove the done items from your pan and stick it back in the oven to continue cooking whatever isn't cooked. Not the end of the world, but why make more work for yourself than you have to. Also, whatever you take out will be sitting there getting cold without efforts on your part to keep it warm while it's waiting for its roasting compadres. Again, more work.
In this dish, the Italian sausages need about 40 minutes to roast. Taking that into account I quarter my onion leaving it in huge chunks so they don't burn while the sausages are get'n done.
Same with the bell peppers. They should be quartered or cut into really big chunks so they don't end up mushy (unless you like mushy). The pepper pieces pictured here could have been a little bigger.
I let the sausages roast for 30 minutes, then turn them and roast another 10 minutes. Perfection.
On a side note, if you aren't trying to eat low carb, go ahead and scoop this dish into beautifully toasted and buttered hoagie rolls, top with provolone cheese, and melt under the broiler for 2 minutes or so. 😉
Sheet
Pan Italian Sausages & Peppers
INGREDIENTS
2
19 oz packages Italian sausages
3
large bell peppers
1
large red onion
salt
& pepper to taste
olive
oil to coat
olive
oil spray
foil
DIRECTIONS
1.
Preheat oven to 450 degrees.
2.
Line a large baking sheet with foil for easy clean up and spray with
oil spray.
3.
Quarter bell peppers. Toss in a medium bowl. Drizzle with a little
olive oil and add salt and fresh ground pepper. Toss to coat and
dump onto your baking sheet.
4.
Nestle the sausages into the baking pan as well.
5.
Spray your onion chunks with olive oil on both sides and salt and
pepper them. Nestle them gently onto your pan so that each chunk stays
together.
Thursday, April 13, 2017
Interpreting Easter for Little Ears
As Easter Sunday approaches the boys and I have set aside our regular Bible class. Instead, I haven been reading out the Bible stories leading up to and about the first Easter. I'm also having them draw a journal page each day about what we are reading and discussing together.
Here are some of their interpretations of the stories so far.
One of the things I'm trying to focus on is the celebration of new life that Jesus' resurrection represents. The life that we thought was lost when Jesus died on the cross is found again when He comes back to life. New life for Jesus means new life for us too. Putting that into terms my boys can wrap their brains around is challenging.
My boys know that every time we ask for forgiveness our bad jobs are erased and we can start new again with a clean slate. That's their current understanding of new life. Unfortunately, that doesn't always apply to our relationships with people, but it always applies to our relationship with God. This is information my boys know and utilize all the time with God and with Matthew and I. My hope is that their hearts will grow to understand the power and beauty of this reality, how deep it goes, how wide it spreads, how true and everlasting it really is. Everlasting life!
Labels:
art journal,
Bible stories,
children,
Easter,
faith,
family,
kids
Tuesday, April 11, 2017
The Huevo-dilla
The Huevo-dilla! This is all Matthew's doing. He named it too. A stroke of husband genius, I tell you.
I think it was a Sunday night and I didn't want to cook - I never want to cook on Sunday nights. Matthew took the reigns of the operation and made a quesadilla with a fried egg and some Tapatio hot sauce sprinkled inside of it. A legend was born - at least in our household. We joke that if we ever started up a food truck it would be a Huevo-dilla truck. Perfect street food. You could fancy it up in all kinds of ways too.
This is what we cook when we're too late or too tired to run into town, we don't want to cook, or just because we're craving one. It often serves as our Sunday night meal.
The trick is the fried egg. You want it a little runny, but not too runny. It needs to be just right so that when you bite into your Huevo-dilla, the egg yolk pops and just enough yolk oozes out to moisten your dilla but not to turn it into a big soggy mess. Although egg yolk dripping down your hand may not be such a bad thing.
If you're ever hit'n the food truck scene and you see a Huevo-dilla truck, look for me. 😉
The Huevo-dilla
INGREDIENTS
2
corn tortillas
About
½ cup of shredded sharp cheddar cheese
1
large egg
a
few dashes of Tapatio hot sauce
olive
oil spray
salt
& pepper to taste
DIRECTIONS
1.
Heat a skillet or the flat side of a grill pan over medium high heat.
2.
Place corn tortillas on your pan and toast one side. Flip them and
add ¼ cup cheese on top of each.
3.
Meanwhile, in another skillet or on the other side of the grill pan,
spray some olive oil.
4.
Crack your egg and sprinkle with salt and pepper. Cook 2 to 3 minutes until edges look cooked, then flip. Cook another couple of minutes until the yolk seems almost over medium - but just barely. You
want to keep it a little runny.
5.
Place your egg on top of one of the cheese covered tortillas. Add a
few dashes of Tapatio and cover with other tortilla.
6.
Be happy!
Sunday, April 9, 2017
Easter Egg Treat Packets
Easter is coming up fast. We're getting geared up to finish our last week of school before spring break and before heading down to spend Easter with my parents. Before we do I wanted to get one last Easter craft in with the boys.
This craft was inspired by some adorable bunny surprise packets I saw on Craft with Mom. For this craft we used an egg pattern instead of bunnies and laced them together with yarn.
I prepped the eggs for the boys and they got started on decorating them with watercolors.
You can decorate the eggs with markers, crayons, or color pencils as well.
After the eggs dried we laced up one side. Then we stuffed them with chocolate eggs and jelly beans and laced up the other side. You can use ribbon if you prefer, but a flat ribbon tends to twist - especially as little fingers are doing the work. I recommend yarn or string.
Here's the egg pattern I used.
Happy Easter!
Friday, April 7, 2017
What's for Dinner? Low Carb Turkey Meatloaf
I know it may not seem like it with all the cupcake recipes I post, but Matthew and I really are on a lower carb diet. I say lower carb because we still eat certain carbs, like potatoes and gluten free pasta. Matthew's down 10 pounds and I'm almost down 20, so we're doing something right. My next challenge is lowering our whole family's sugar intake. More on that later.
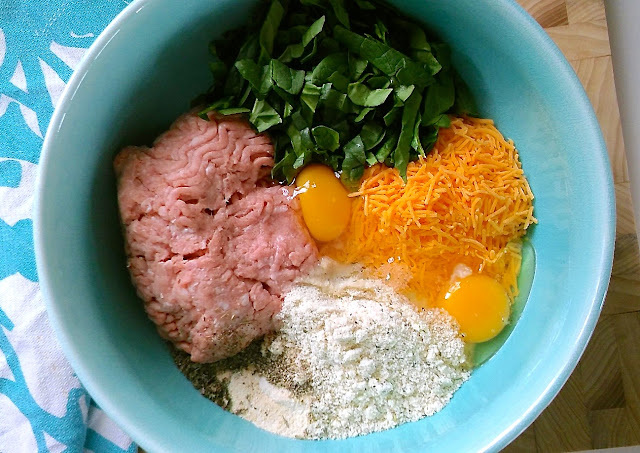
When you're trying to get a good shot and even use a pretty bowl and your egg runs off to the side. Arg. |
Meatloaf is pretty easy to make low carb - it's mostly ground meat after all. This turkey meatloaf recipe originally called for bread crumbs. I used a seasoned almond meal mixture that I use for "breading" chicken and fish. It worked out terrific.
I served our low carb meatloaf with roasted potatoes and carrots. We can't kick all carbs to the curb.
Low
Carb Turkey Meatloaf
INGREDIENTS
1 lb ground turkey
1 cup seasoned almond meal (see recipe below)
1 cup chopped spinach
1 cup shredded sharp cheddar
1/2 tsp salt
1/8 tsp dried thyme, crushed
1/8 tsp dried basil
1/2 tsp garlic powder
1/2 tsp onion powder
1/8 tsp fresh ground pepper
2 large eggs
1/3 cup water
1/4 cup ketchup
DIRECTIONS
1. Preheat oven to 400 degrees.
2. Line a baking sheet with foil and spray with olive oil spray.
3. Combine all ingredients, except ketchup, in a large bowl and hand mix. Form into a loaf and place on your baking sheet.
4. Bake for 25 minutes.
5. Coat top and sides with ketchup and bake another 10 minutes.
Seasoned
Almond Meal
(Original recipe from Paleo Running Momma)
INGREDIENTS
1 cup almond flour
1/4 cup coconut flour
1 scant tsp basil
1 scant tsp oregano
1/8 tsp thyme, crushed
1 1/4 tsp salt
1/8 tsp black pepper
1 tsp onion powder
1/2 tsp garlic powder
DIRECTION
1. Stir all ingredients together and store in an air-tight container.
* I use this recipe in place of Italian bread crumbs.
Thursday, April 6, 2017
Chat Night
If you've read my "About" page you know that one of the things Matthew and I are serious about is investing in our marriage. You probably already know that this marriage thing is hard and messy work - vulnerable conversations, self sacrifice, swallowing your pride, confrontation, quality time, and so on and so on. One of the things we've learned on our short 11 year journey is how to be intentional about pouring something in instead of expecting it to always pour out.
One of our intentional practices is "Chat Night." Once a week, after the kids go down for the night, Matthew and I leave the TV off (which is a sacrifice for us, let me tell you) and spend some quality face to face time just chatting. Sometimes it looks like wine and cheese over candlelight. Sometimes it looks like mixed drinks on the couch. Sometimes, when we're exhausted, it looks like a short chat full of yawns before we throw ourselves into bed.
Sometimes the night feels like a small and easy commitment - sharing a drink with a good friend. Sometimes it feels hard and long because all we want to do is eat dessert in front of the television or just go to sleep. Whatever form it takes from week to week it's always a commitment kept and an investment.
Chat Night connects us in a way that's hard to experience with a 50 hour work week + commute time, 3 little kids demanding things and attention, a house that collects mess like a hobby, laundry that never ends... . You get the picture. It ensures that at least once a week we will look into each others eyes, remind ourselves of what the other looks like, and say something to each other - it doesn't really matter what - just chatting. Chatting to invest in each other and what we have together. Chat Night!
One of our intentional practices is "Chat Night." Once a week, after the kids go down for the night, Matthew and I leave the TV off (which is a sacrifice for us, let me tell you) and spend some quality face to face time just chatting. Sometimes it looks like wine and cheese over candlelight. Sometimes it looks like mixed drinks on the couch. Sometimes, when we're exhausted, it looks like a short chat full of yawns before we throw ourselves into bed.
This night we played with drink recipes using homemade caramel sauce. |
His and Hers. |
Sometimes the night feels like a small and easy commitment - sharing a drink with a good friend. Sometimes it feels hard and long because all we want to do is eat dessert in front of the television or just go to sleep. Whatever form it takes from week to week it's always a commitment kept and an investment.
Chat Night connects us in a way that's hard to experience with a 50 hour work week + commute time, 3 little kids demanding things and attention, a house that collects mess like a hobby, laundry that never ends... . You get the picture. It ensures that at least once a week we will look into each others eyes, remind ourselves of what the other looks like, and say something to each other - it doesn't really matter what - just chatting. Chatting to invest in each other and what we have together. Chat Night!
Wednesday, April 5, 2017
What's for Dinner? Hungarian Mushroom Soup
There is no better soup. Seriously! I am a big fan of soup. I have many favorite and treasured recipes that I may share with you some day when I am feeling charitable. But this one. Oh this one. This one if my very favorite. The flavors are amazing. It is rich and creamy and mushroomy and loaded with paprika. Try this soup, and if it isn't the very best you've ever had, I'll give you 5 dollars. Ok, I won't really give you 5 dollars, but I'll question my friendship with you.
I fortuitously came across this recipe on Pinterest. (Thank you Pinterest!) The original recipe is from Adventures in Cooking. I changed it, of course, cause that's how I roll. I pretty much adjust every recipe I come across and adapt it to how I stock my pantry.
One of the things that makes this soup so flavorful is the way the onions and mushrooms are cooked down.
The onions cook down for 5 minutes. You want to see them start to turn brown. That's flavor right there.
The mushrooms get added to the onions and cook down with the seasonings for 15 minutes.
After the cooking time the mushrooms will be much darker and full of flavor.
The soup is thickened and taken to new heights of creaminess with a white sauce. On top of that, a cup of sour cream is stirred in at the end.
If you ever thought it was possible to die in a bowl of soup your suspicions will be confirmed with this recipe.
I fortuitously came across this recipe on Pinterest. (Thank you Pinterest!) The original recipe is from Adventures in Cooking. I changed it, of course, cause that's how I roll. I pretty much adjust every recipe I come across and adapt it to how I stock my pantry.
One of the things that makes this soup so flavorful is the way the onions and mushrooms are cooked down.
The mushrooms get added to the onions and cook down with the seasonings for 15 minutes.
After the cooking time the mushrooms will be much darker and full of flavor.
If you ever thought it was possible to die in a bowl of soup your suspicions will be confirmed with this recipe.
Hungarian
Mushroom Soup
(Original
recipe from Adventures in Cooking)
INGREDIENTS
1
Tbsp olive oil
2
large onions, diced
4 8 oz packages of brown mushrooms (cremini/baby bella), washed and thinly sliced
4
tsp smoked paprika
3
tsp salt
½
tsp fresh cracked pepper
2
tsp dried dill
½
tsp thyme
½
tsp marjoram
2
Tbsp soy sauce
4
cups chicken broth, maybe more
6
Tbsp butter
½
cup gluten free all purpose flour blend (or flour)
2
cups milk, maybe more
¼
cup fresh lemon juice
1
cup sour cream
DIRECTIONS
1.
Heat olive oil in a dutch oven or soup pot over medium heat. Add
onions and saute for 5 minutes until they start to turn brown.
2.
Add mushrooms, seasonings, soy sauce, and 1 cup of stock. Cook on
medium low for 15 minutes. The mushrooms will look quite dark.
3.
While the mushrooms are cooking down make your white sauce. Melt
butter in a medium saucepan on medium low heat. Whisk in flour and
cook for about a minute. Slowly whisk in milk and cook on low until
your sauce looks creamy and thick. (If using gluten free flour you
may need to add ½ to 1 cup more milk.)
4.
Add the white sauce to your mushroom mixture along with the lemon
juice and 3 cups broth. Cook covered on very low heat for 20 minutes
stirring occasionally.
Subscribe to:
Posts (Atom)